How To Guides - All Employees
This book contains all how to processes for use by all employees
- How to Access Office Buildings and Arm/Disarm Alarm System
- How to Connect to Hotspot or Wi-Fi
- How to Submit Daily Job Logs
- How to Submit Requests to IT Help Desk
- How to Submit Safety Trainings
- How to Submit Cyber Security Trainings
- How to View Paystubs - Field Users
- How to Generate Accountability Site Access Report
- Using Shared Printers
- How to Enroll to Receive Your Payroll Statement by Email
How to Access Office Buildings and Arm/Disarm Alarm System
Purpose:
To explain how to get into office building locations and how to arm/disarm the alarm system
Prerequisite:
- Have access code entered into security system for all locations that will be accessed by employee
Who's Responsible:
- All active employees trying to access office locations
Overview:
- All office locations entrance doors are locked 24/7
- Alarm system automatically disarms at 6:00 AM, Monday - Friday
- Alarm system automatically sets at 11:00 PM every day
- Alarms do not disarm automatically on weekends or holidays
Process:
- Enter last 4 digits of social security number and last two digits of birth year into the key pad located a the entrance of the location you are trying to enter
- If you are the first person entering the building before 6:00 AM Monday - Friday or anytime on the weekends or holidays, go to the security keypad located inside the door, type in last four digits of social security number and then the number 1. This disarms the security alarm system
- If you are the last person leaving the building, go to the security keypad located inside door, type in last four digits of social security number and then the number 2. This arms the security alarm system. NOTE: Make sure to check the building to verify that you are the last one in the building. You can use the intercom system in the Mt. Pleasant office to state you are leaving and alarming the system. Wait to see if anyone replies that they are still in the building
Troubleshooting:
- Submit a ticket to IT support@jranck.com
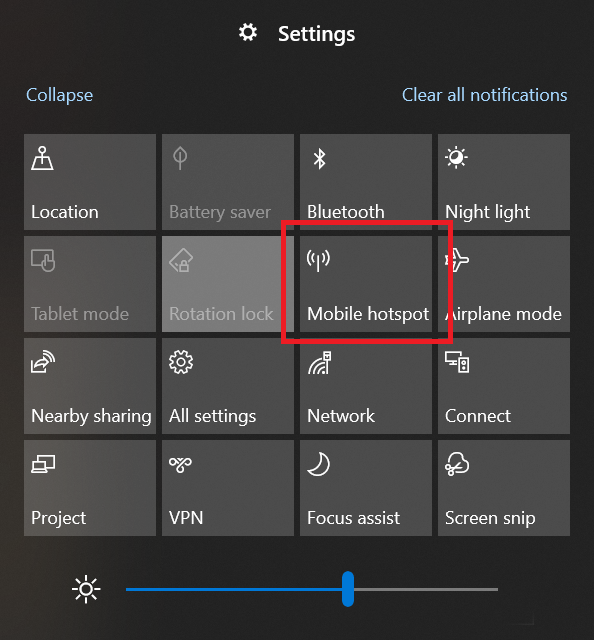
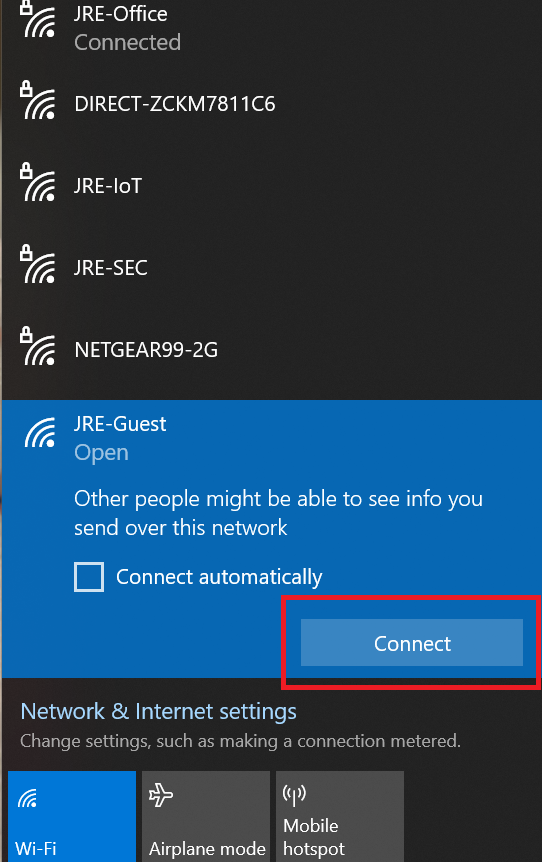
How to Connect to Hotspot or Wi-Fi
Purpose:
To give directions on how to link to a hotspot or Wi-Fi with remote computer
Prerequisite:
- Remote desktop
- Access to hotspot or Wi-Fi
Who's Responsible:
- All employees working remotely
Process:
- How to connect to a Hotspot
- Sign into computer
- Click on Manage notifications icon in the lower right corner of computer desktop

-
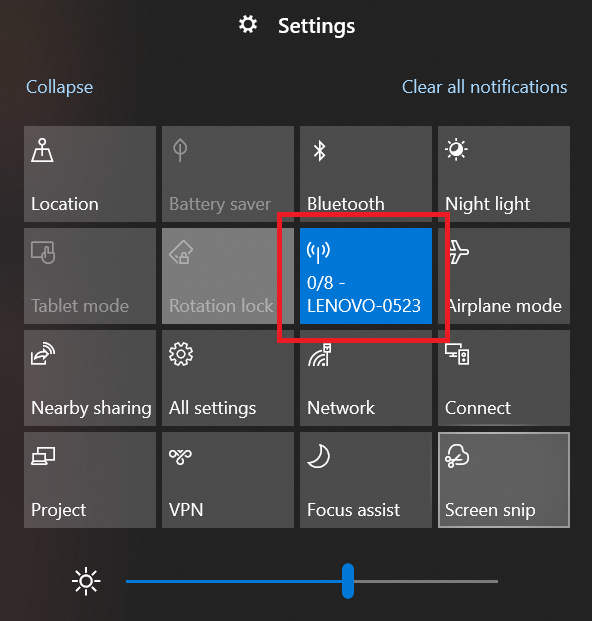
- Make sure hotspot is on and active
- Click Mobile hotspot button
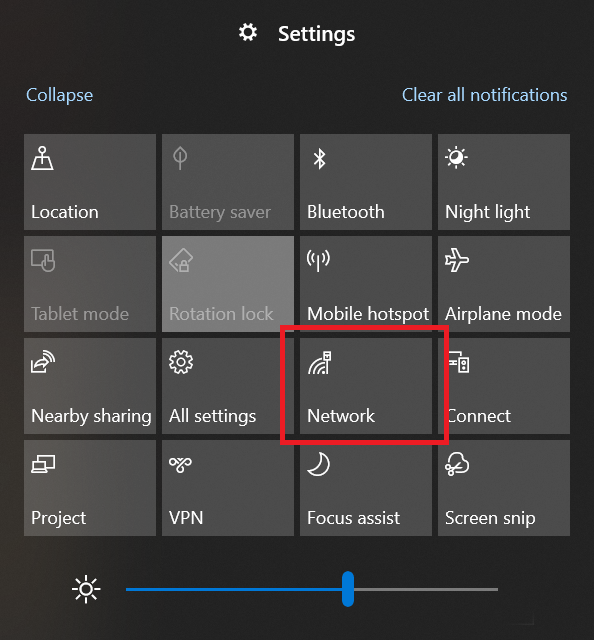
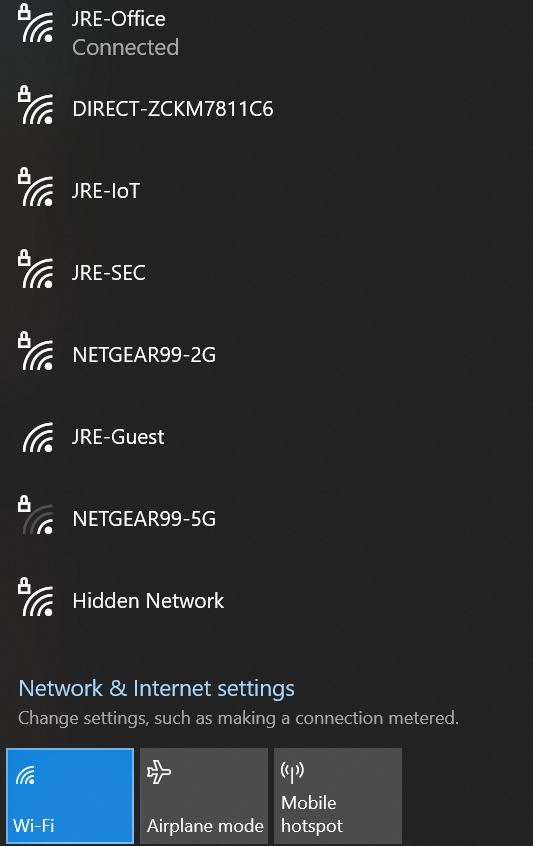
- How to connect to internet/Wi-Fi
- Sign into computer
-
Click on Manage notifications icon in the lower right corner of computer desktop

-
- Click the internet/Wi-Fi connection you want to link to
-
- System will display when you are connected
Troubleshooting:
- Submit a ticket to IT support@jranck.com
How to Submit Daily Job Logs
Purpose:
To give instruction on how to create, track and maintain daily job log documents for proper reporting purposes
Prerequisite:
- Have access to Our Current web site
Who's Responsible:
- All foremen, project managers and project management assistants with responsibility for creation, maintenance and review of site daily job logs
Process:
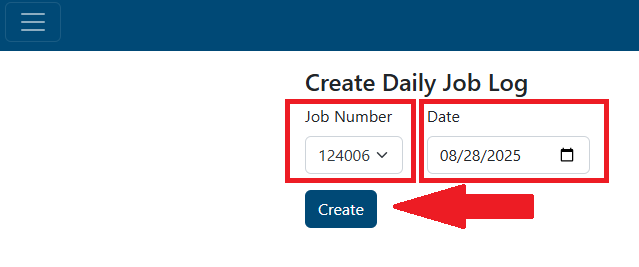
- How to create a daily job log (from scratch)
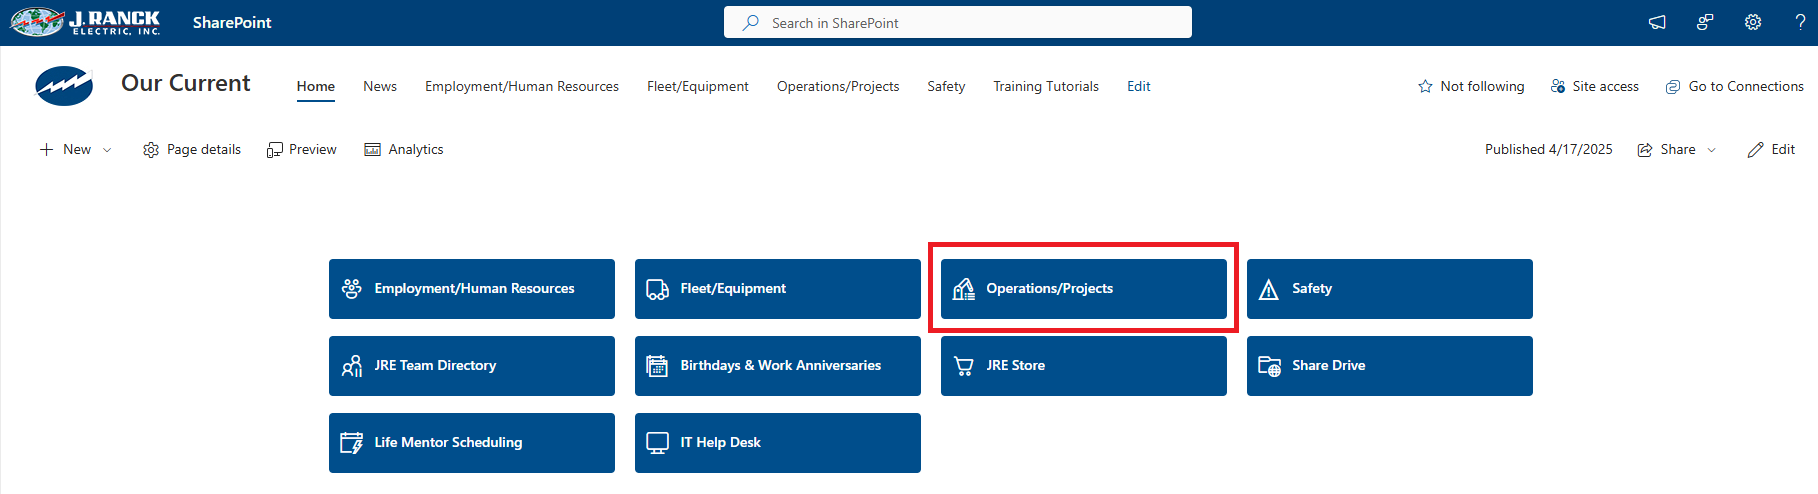
- Go to Our Current web site
- Click on Operations/Projects button

-
- Click on Daily Job Log button

-
- Click on Create Job Log button

-
- Select job number from the Job Number dropdown list NOTE: the list will show all active and inactive jobs. You can start typing a job number or job name and the list will auto populate with options to choose
- Enter date for current daily job log
- Click the Create button
-
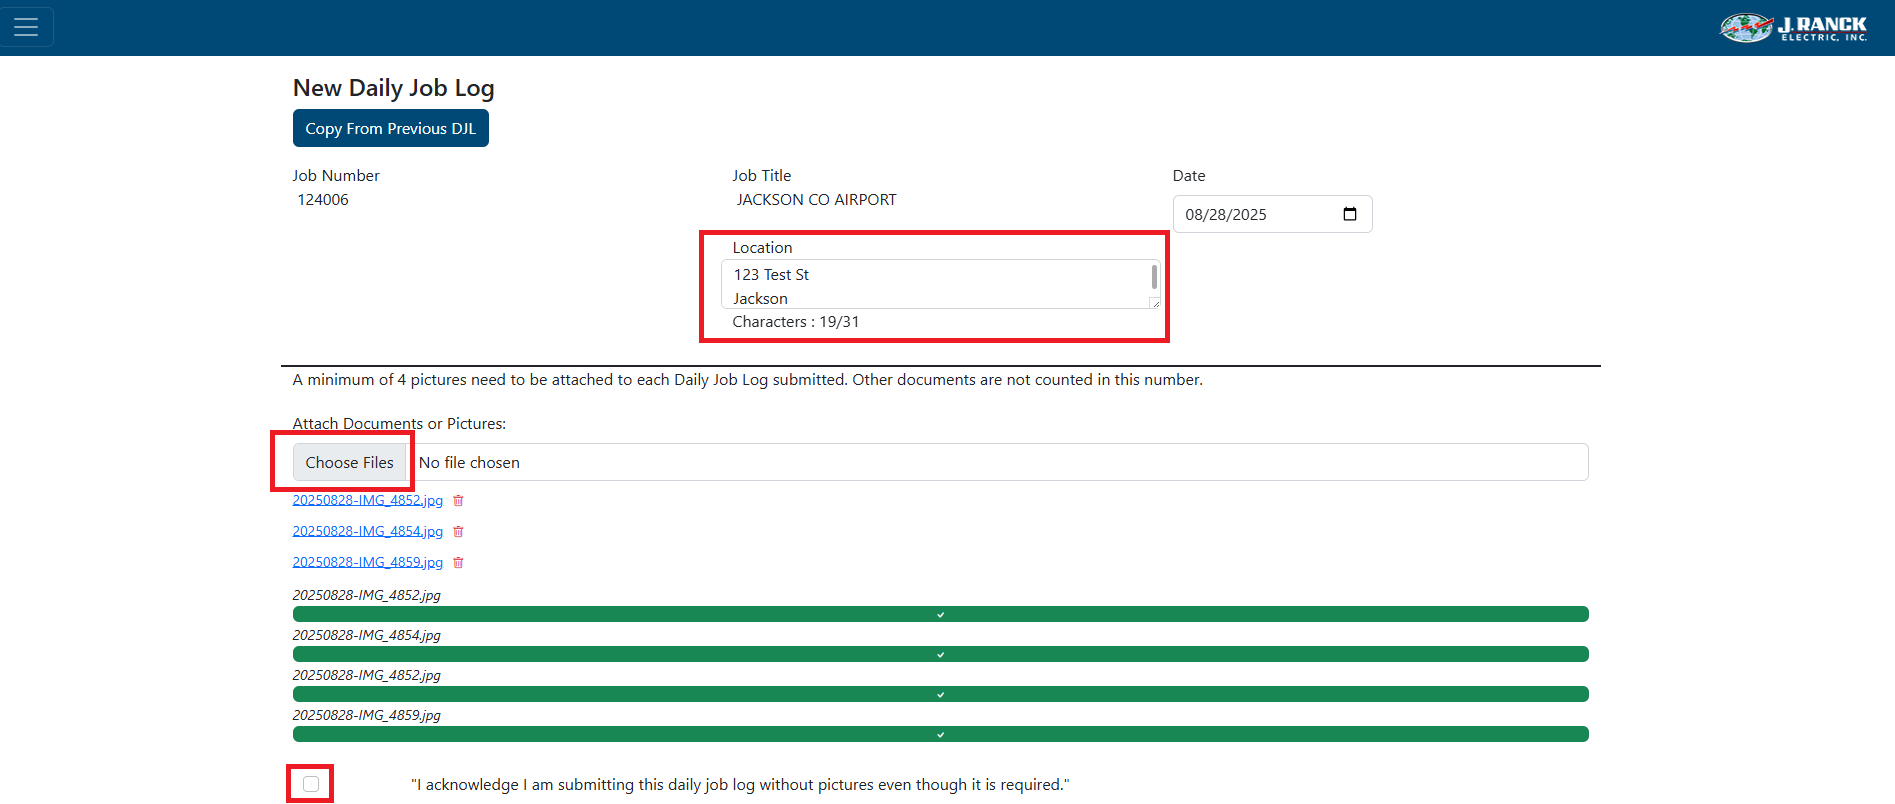
- Type in job location
- Attach any documents and pictures NOTE: At least 4 pictures are required to submit a daily job log per day
- Click Choose Files, select files wanted to load
- If there is a specific reason pictures cannot be sent, check the box to acknowledge that pictures were not attached
-
- Enter manpower breakdown
- Only active employees are in the dropdown lists. Start typing in name and selection will filter down. This will also keep a count of manpower entered
- Click on Employee and either scroll down to find employee or start to type in their name to filter the list down
- Enter equipment that is on site
- Only active equipment will be listed in the dropdown list
- Click on Unit Number and either scroll down to find equipment or start to type in unit number or equipment name to filter the list down
- Continue to click on all equipment from list that is on job site
- If more equipment is needed to list that is not in the dropdown list (i.e. rental equipment), click the check box for Add more equipment?
- Enter rental equipment information in the Equipment - other text box
- If applicable, in the Visitor section, enter Subcontractors, Inspectors, and/or Other visitors text boxes
- Enter weather information in Weather section NOTE: If the zip code for the job site is entered, the temperature, precipitation, and rain/snow boxes will automatically fill in. You may override what pulls in
- If there is a weather delay, click on the weather delay check box and enter explanation
- Enter manpower breakdown

-
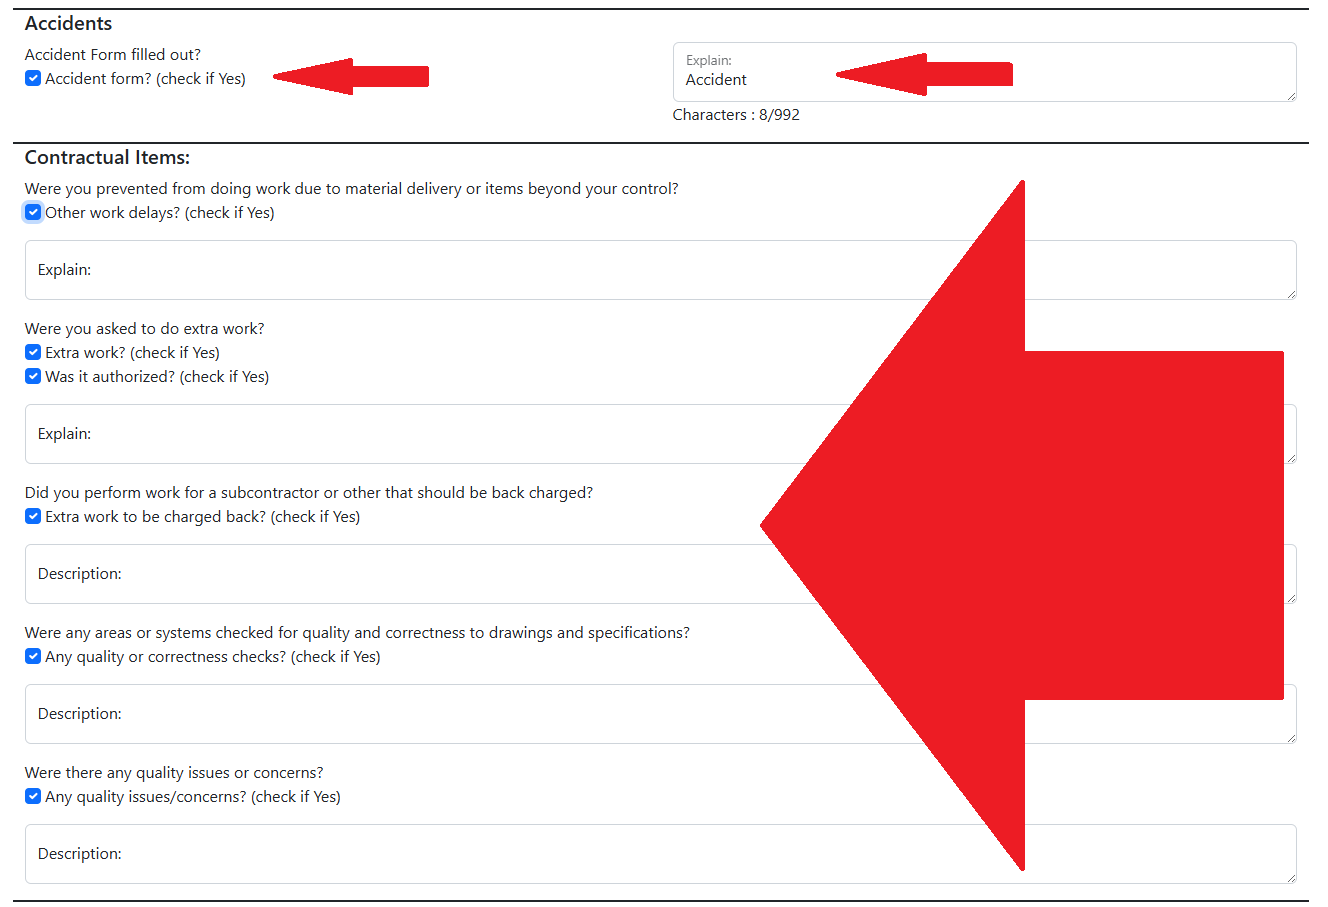
- If there was an accident and the accident form was filled out, click the check box for Accident form? and enter explanation
- In Contractual Items section, check any boxes that are applicable and input explanations
-
- Enter summary of daily work in the Daily Work Summary NOTE: There is a talk to text option for this box. Click on the microphone in the upper left corner of the text box and talk to test is on. Make sure to reread what was recorded for accuracy
- To print the form click the Print button
- To Save changes and complete later, click Save Changes
- To Submit the request to route to PM and PMA, click Submit

- How to create a daily job log (using copy option)
- Go to Our Current web site
- Click on Operations/Projects button
-
- Click on Daily Job Log button

-
- Click on Create Job Log button

-
- Select job number from the Job Number dropdown list NOTE: the list will show all active and inactive jobs. Yu can start typing a job number or job name and the list will auto populate with options to choose
- Enter date for current daily job log
- Click the Create button

-
- Click Copy From Previous DJL button

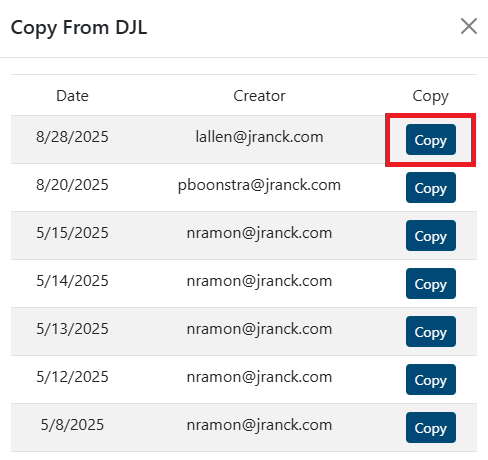
-
- Once all fields are filled in and at least 4 pictures attached, click Submit to route to PM and PMA for review

- To view, edit, or print/download a daily job log that you created
- Go to Our Current web site
- Click on Operations/Projects button
-
- Click on Daily Job Log button
-
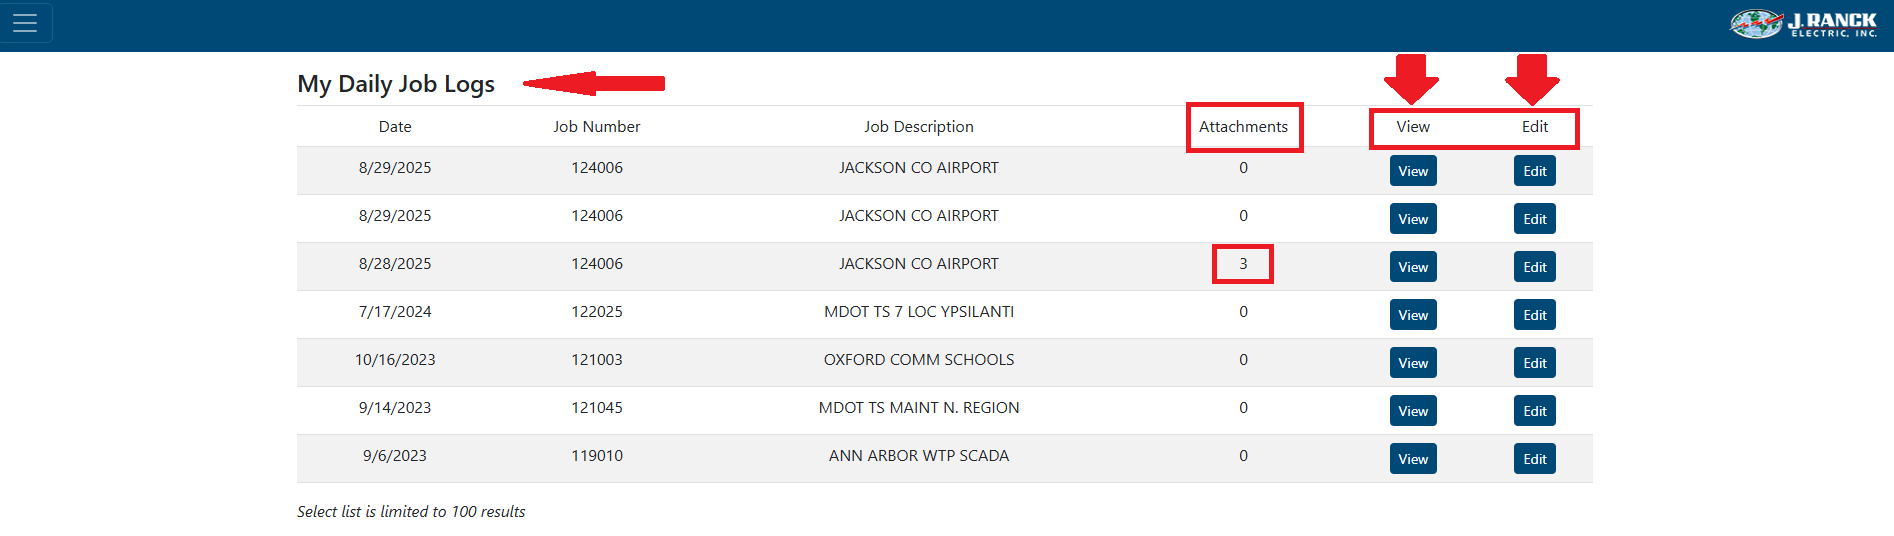
- Click on My Job Logs button

-
- A list of the last 100 job logs that you have submitted will display, ordered by most recent date
-
- In the attachment column it displays who many attachments (documents, pictures) are included in that daily job log
- You can either "View" any of your previous 100 daily job logs or "Edit" daily job logs that have been not submitted yet
- To edit, click the Edit button
- The edit page will be identical to the page description above used in the daily job log "Create" process after a job number has been selected
- You will be able to update all the same fields available to you on the initial create page including the ability to add or remove employees, equipment, and/or attachments
- You can then save or submit the updated daily job log
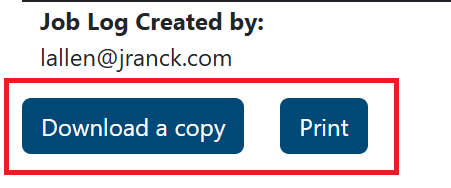
- To view, click the View button
- You will be able to view the daily job log from here and also download or print a PDF copy of the daily job log
- How to search for and select a completed daily job log form for a job
- Go to Our Current web site
- Click on Operations/Projects button
-
- Click on Daily Job Log button
-
- Click on Search Job Logs button

-
- You will be presented with a screen with a default selection list and filter options for a job number or year and an (optional) email or portion of an email name. Filters can be applied via the "Filter" button or clicking Enter
- Each completed review presented can be viewed by selecting the "View" button
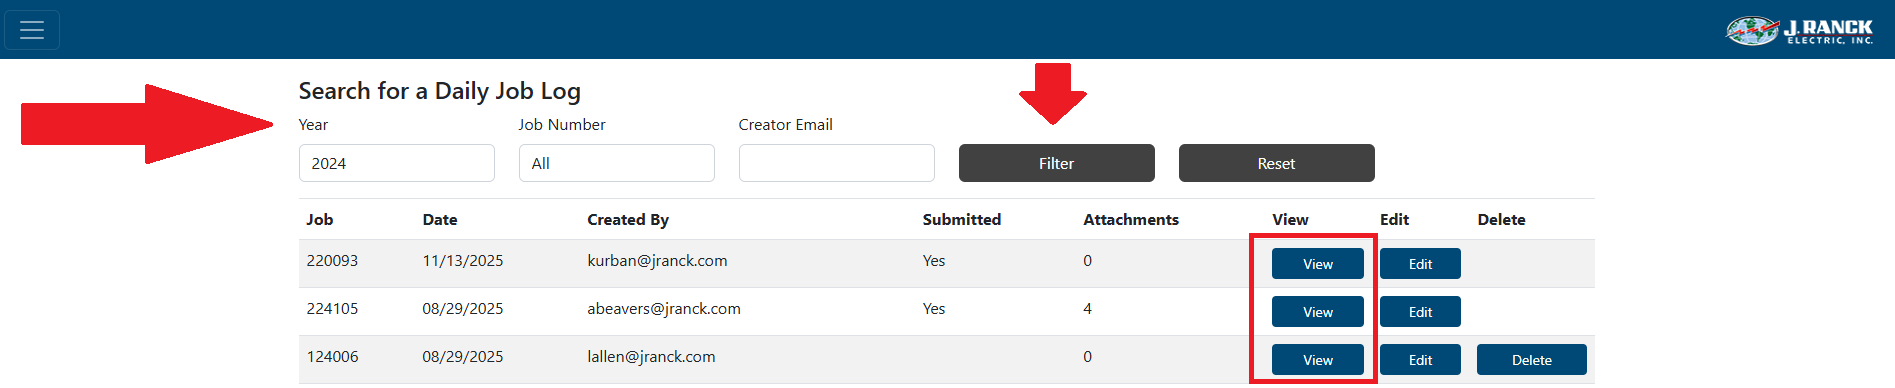
-
- The "View" page allows you to review the daily job log and you can either download a copy or print

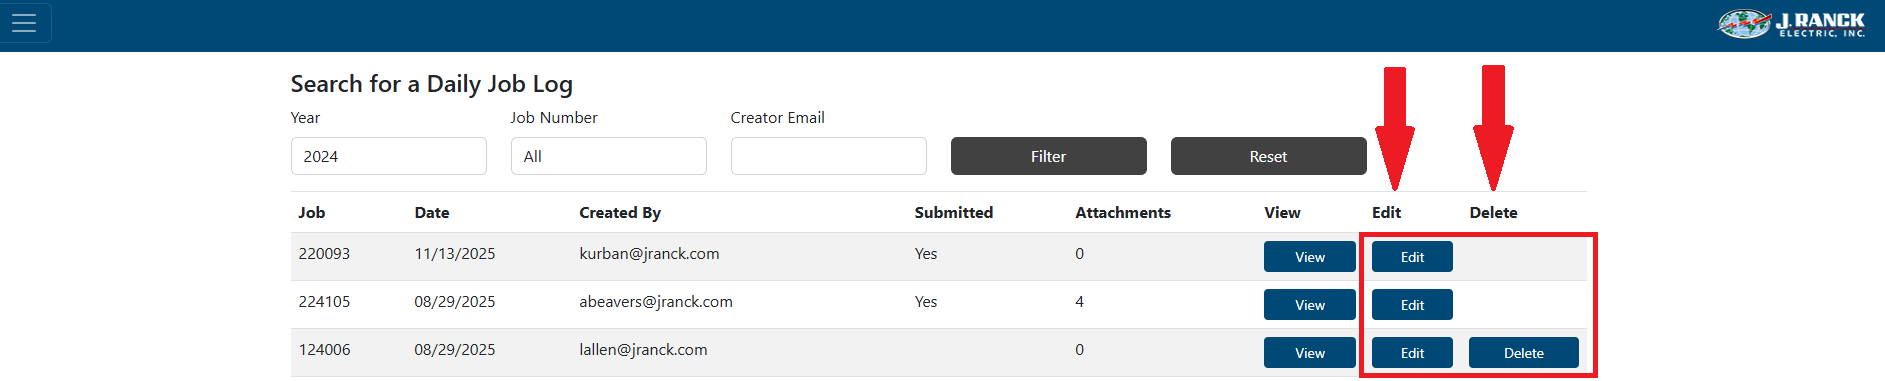
-
- With appropriate security (PM or PMA), the "Edit" button allows you to make additions to comments or add/remove clarifications from the selected daily job log.
- With appropriate security (PM or PMA), the "Delete" button allows you to remove a daily job log
Troubleshooting:
- For technical issues submit a ticket to IT support@jranck.com
- For process questions send email to Justin Thielen jthielen@jranck.com or Stacie Geiger sgeiger@jranck.com
How to Submit Requests to IT Help Desk
Purpose:
To show the ways requests can be sent to the IT help desk for assistance with technical questions or help fixing an issue.
Prerequisite:
- Access to email or phone
Who's Responsible:
- All employees
Process:
- Via Email
- Send email to support@jranck.com with questions/issues.
- A ticket will be created for the IT department.
- All IT team members will be able to see all requests submitted
- Include as much information as possible on the issue
- Attach screen shots of issue if possible/applicable
- Email follow ups will be sent via the ticket process to the requestor and anyone else CC'd on the ticket
- Via Phone
- External phone call (989) 775-1010
- Internal phone call extension 2120
- Someone in the IT department will answer the phone. If no one answers, leave a message and a ticket will automatically be created and all IT members will be able to see it and listen to the voice mail
- Via Drop-in
- Stop by any of the IT teams offices. If someone's door is closed that means they are either working on something critical or are in a meeting. Pick another IT team member to go to
- If IT can address a quick question, they will do so
- If not, they may ask that a ticket be submitted so the information is gathered, and the request is not lost or forgotten about. This also allows tracking of the question/issue to identify if others are having the same question/issue
How to Submit Safety Trainings
Purpose:
Provide employees the basic steps to use and complete submission of required safety trainings
Prerequisite:
- JRE account and password
Who's Responsible:
- All employees
Process:
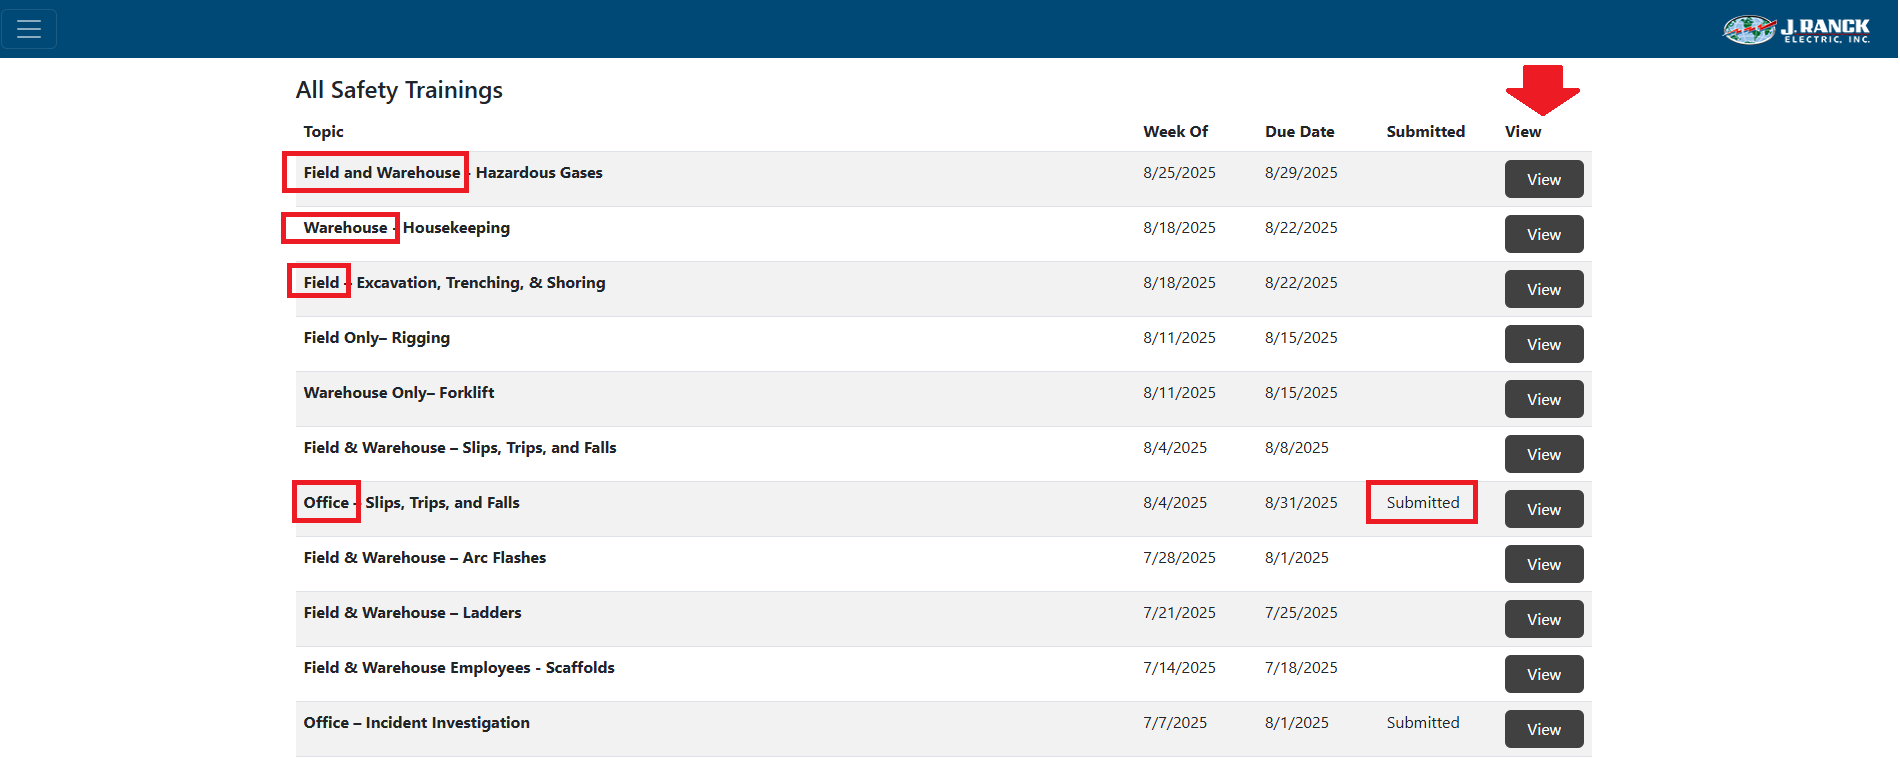
- How to View Safety Trainings
- Navigate to Safety Trainings app on Our Current, located on the Safety page
- Click on View Safety Trainings button

-
- Safety trainings that need to be completed are listed under All Safety Trainings NOTE: The topic column will indicate Field, Warehouse, or Office. You only need to complete the trainings for your area (i.e. office employees only need to complete trainings identified with Office in the topic name)
- The trainings that have been completed will indicate that the training has been "Submitted" in the Submitted column
- You can complete, review or amend a training by selecting the "View" button
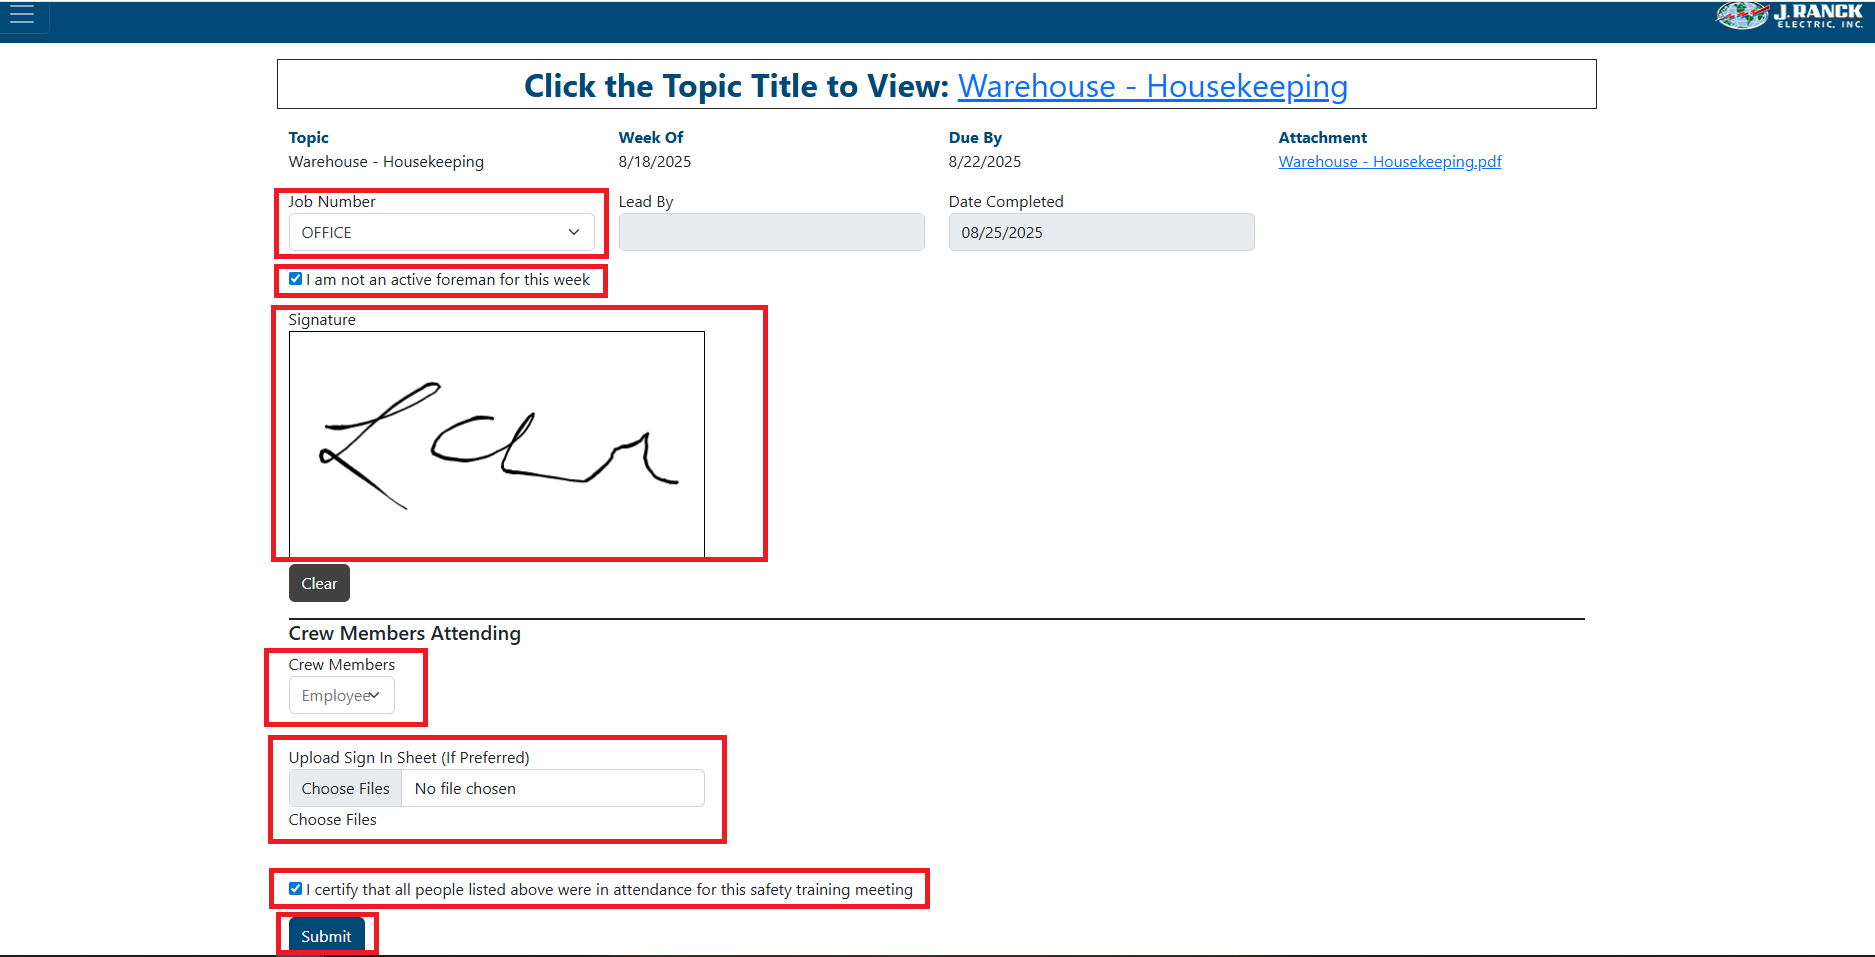
- How to Complete a Safety Training
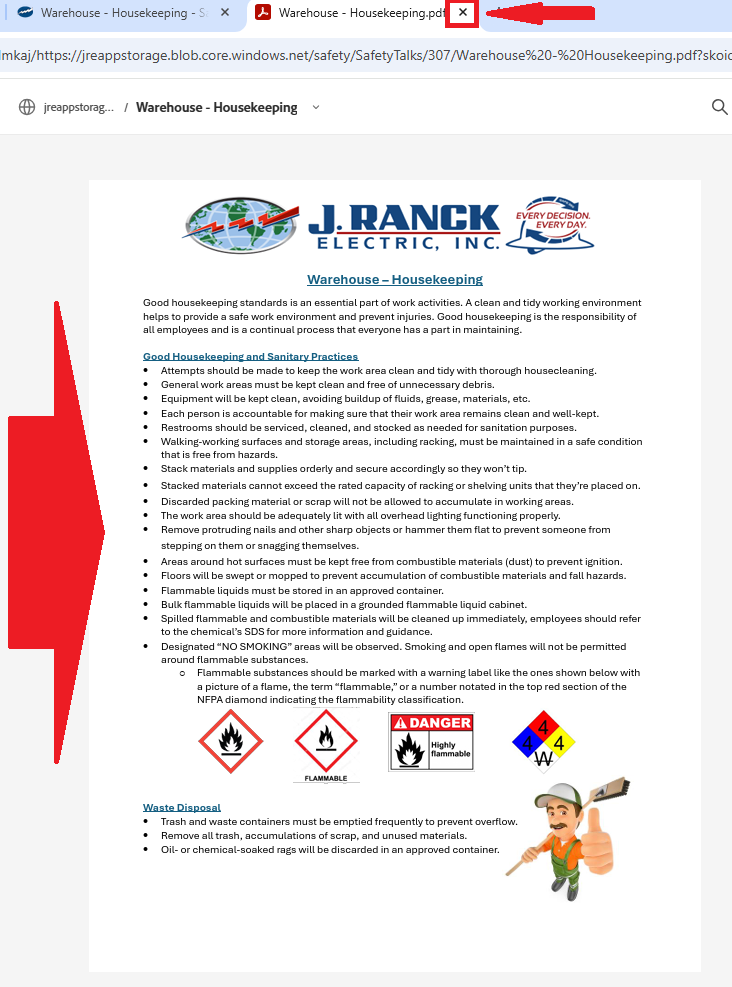
- Navigate to the safety training you wish to complete, view or amend by clicking on the "View" button

-
- At the top of the page, click the topic title link or the Attachment link to view the associated training

-
- Cover the information in the training document
- Once done, close the training document
-
- Select job number, PREFAB, SAFETY, OFFICE, PREFAB WAREHOUSE, or WAREHOUSE from the Job Number selection list
- LEAD BY and Date Completed will be filled out automatically
- For office and warehouse employees, check the box indicating that "I am not an active foreman for this week"
- Sign your name in the signature box
- For any crew members that were a part of the safety training, select their names from the "Employee" selection box. You can enter a partial name or title to filter the selection NOTE: You can optionally upload a scan of a sign-in sheet
- Check the box to certify that everyone listed was in attendance
- Click "Submit" button
Troubleshooting:
- For technical issues submit a ticket to IT support@jranck.com
- For process questions send email to safety@jranck.com
How to Submit Cyber Security Trainings
Purpose:
Provide employees the basic steps to use and complete submission of required cyber security trainings
Prerequisite:
- JRE account and password
Who's Responsible:
- All employees
Process:
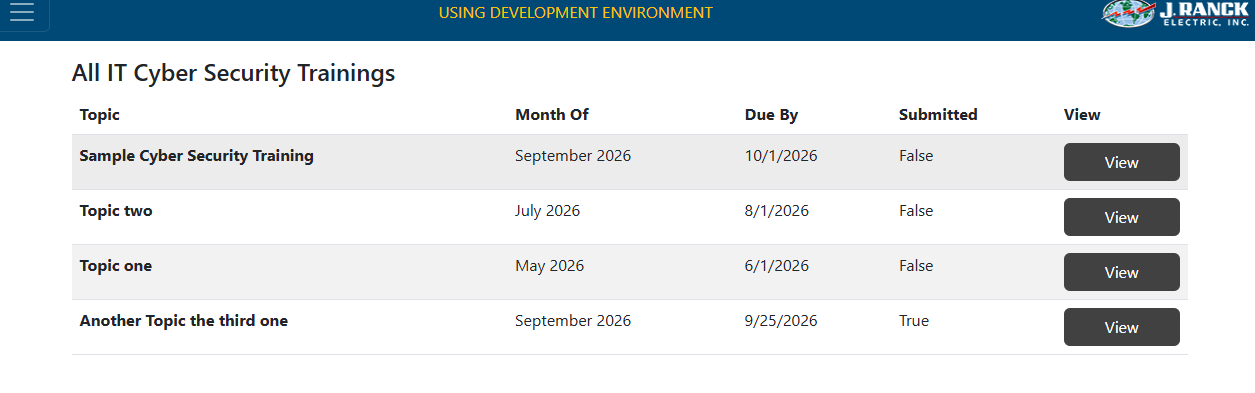
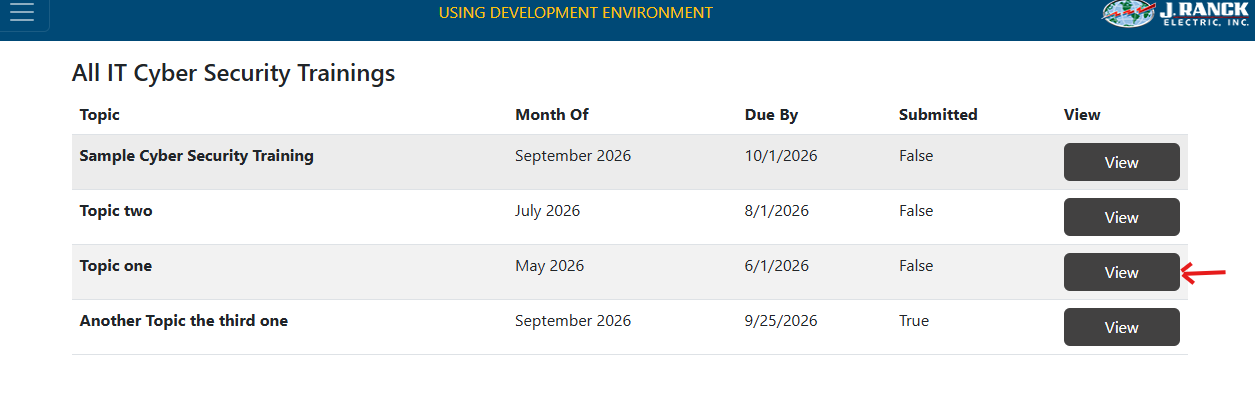
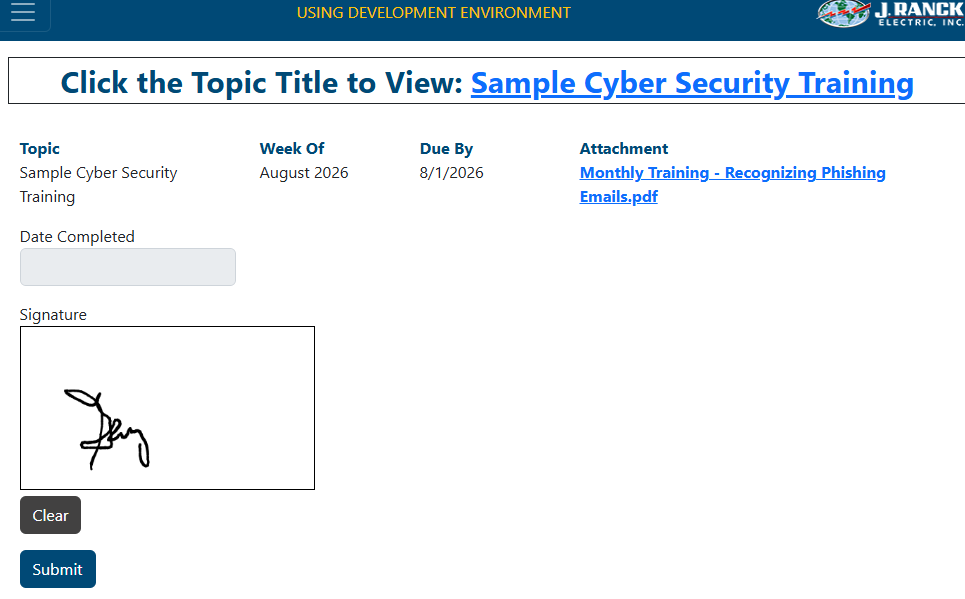
- How to View Cyber Security Trainings
- Navigate to Cyber Security Trainings app on Our Current, located on the Safety page
- Click on View Cyber Security Trainings button

-
- Cyber Security trainings that need to be completed are listed under View Cyber Security Trainings
- The trainings that have been completed will indicate that the training has been "Submitted" in the Submitted column
- You can complete, review or amend a training by selecting the "View" button
- How to Complete a Cyber Security Training
- Navigate to the training you wish to complete, view or amend by clicking on the "View" button
-
- At the top of the page, click the topic title link or the Attachment link to view the associated training
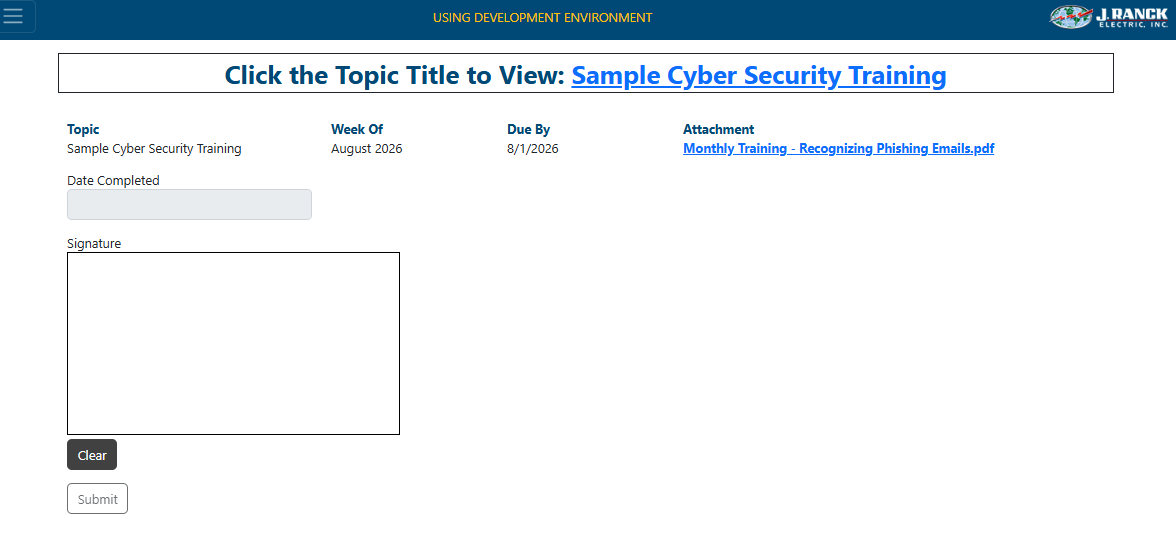
-
- Cover the information in the training document
- Once done, close the training document

-
- Sign your name in the signature box
- Click "Submit" button
Troubleshooting:
- For technical issues submit a ticket to IT support@jranck.com
- For process questions send email to support@jranck.com
How to View Paystubs - Field Users
Purpose:
Show field users how to login the first time and view JRE paystubs
Prerequisite:
- Valid jranck email and initial password
Who's Responsible:
- Field employees
Process:
- Go to J Ranck web site home page
- Click the upper Right Menu option

- Scroll down and click Employee Portal
- Input jranck email address
- Change password

- Receive success message
- Go to J Ranck web site home page
- Click on Employee Portal
- Click Next

- Click Use different method

- Click Phone option

- Enter cell phone number

- Click Get code text
- Enter code received from phone text
- Click Next


- Go to J Ranck web site home page
- Click on Employee Portal
- Click Employment/Human Resources button on Our Current home page

- Click on Paystub View button

- Enter employee jranck email address
- Click Next

Troubleshooting:
- Submit a ticket to IT support@jranck.com
How to Generate Accountability Site Access Report
Purpose:
To explain how to generate an accountability site access report
Prerequisite:
- Have OBDC configuration set up on electronic device (laptop/tablet) to allow query refresh to pull active employee list from Spectrum
- Have admin access set up to receive emails with excel attachment from Virtual Keypad
- Have edit access to Share Drive>All Users>MTP>Safety>ACCOUNTABILITY-SITE ACCESS folder
- If any of the above items are needed, contact IT
Who's Responsible:
- Safety department
Overview:
- All employees must use their badge to access office locations and job sites that are large enough to have keypad set ups for accountability in case of safety issues.
- Employees should not piggy back to get into buildings
- If badges are lost/misplaced/forgotten, employee can enter their assigned pin code to gain access. This will allow the system to log them as checking into the site
- This report will show who has checked into a site, what site, and their phone numbers. It will also show anyone that is an active employee, that has not checked into a site
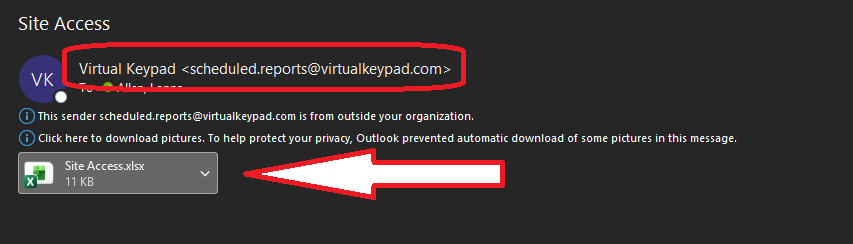
Process:
- Email is received from Virtual Keypad at 8:03 am every morning
- Open the Site Access.xlsx excel spreadsheet
- Click on the Enable Editing button at the top
- Delete columns D (Message), E (User No.), G (Area Name), H (Zone No.), I (Zone Name), J (Door Name), K (Output Name), and L (Count)
- To do this left click on the column letter to choose the whole column, then right click to open options and scroll down to Delete option and click it. This removes that column from the spreadsheet.
- To do this left click on the column letter to choose the whole column, then right click to open options and scroll down to Delete option and click it. This removes that column from the spreadsheet.

- Click on the headers in column 1 to select them all
- Click on the Data tab at the top of the page
- Click on the Filter icon to put filters across the headers
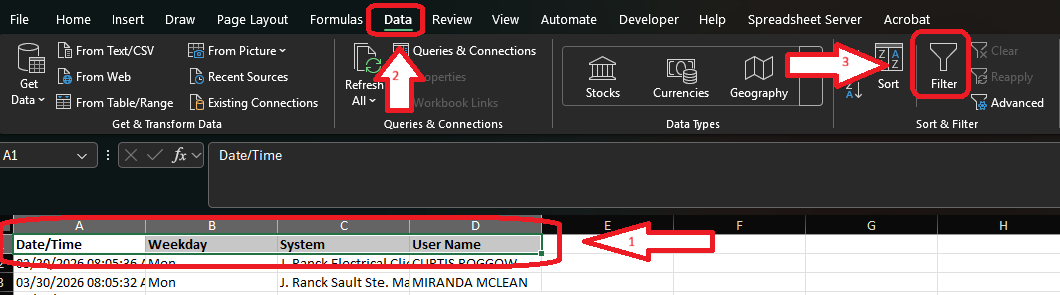
- Left click on column D to select the entire column
- Click on Remove Duplicates option in the tool bar
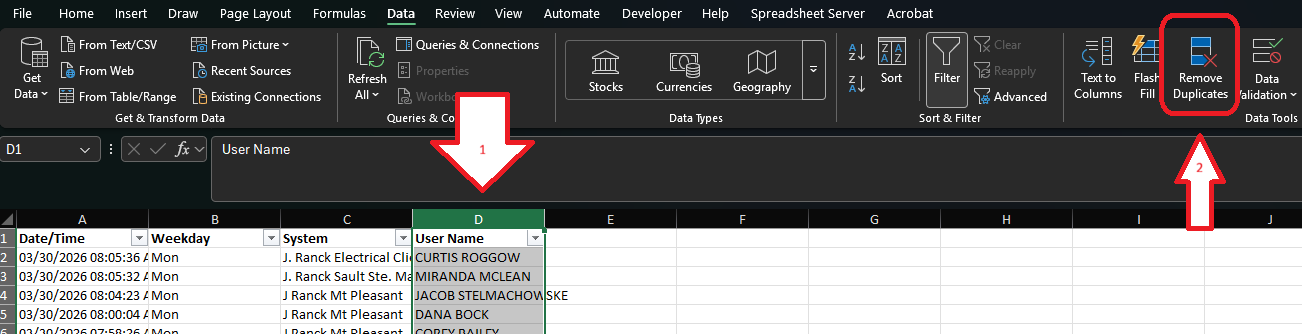
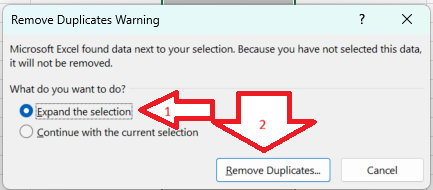
- Leave Expand the selection option chosen
- Click Remove Duplicates button
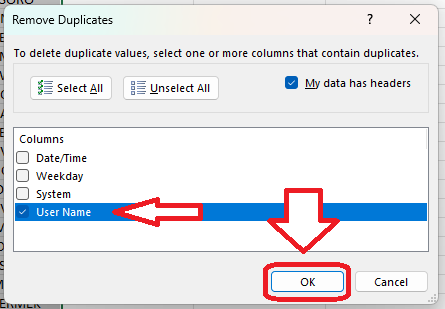
- Click Unselect All button
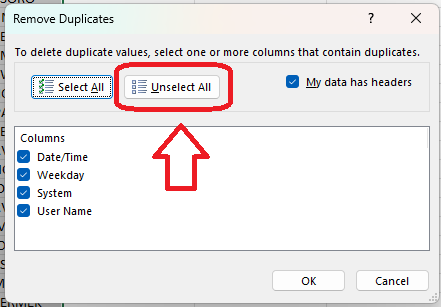
- Click User Name to check the box
- Click Ok
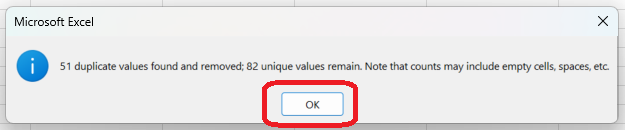
- A message box will pop up with how many duplicates are being removed. Click Ok
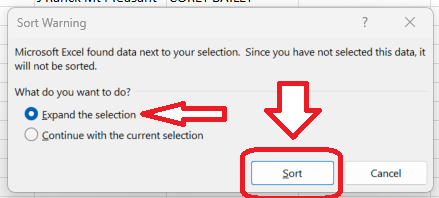
- With column D still chosen, click sort AtoZ option in tool bar
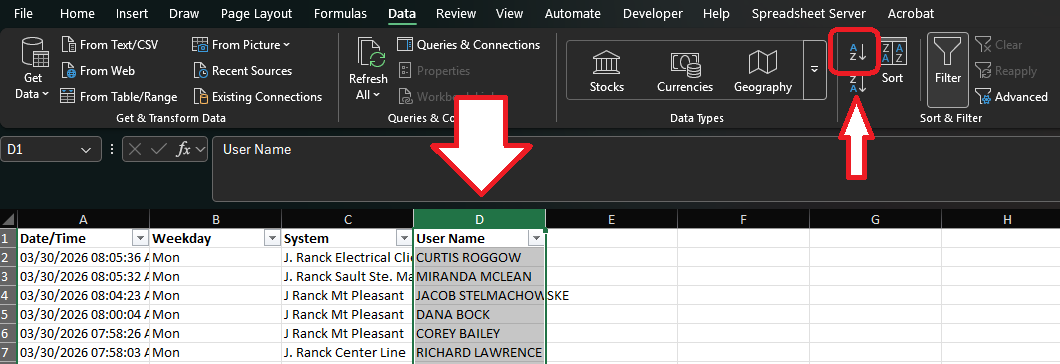
- Leave Expand the selection option chosen
- Click Sort button
- Right click on column D to select it
- Click on Cut option
- Right click on column C
- Click on Insert Cut Cells option
- This moves the User Name column to be before the System column
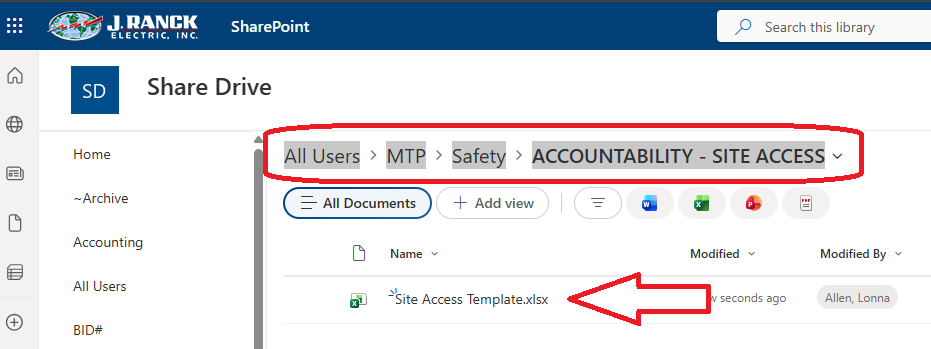
- Open the Site Access Template.xlsx from the Share Drive All Users>MTP>Safety>ACCOUNTABILITY-SITE ACCESS
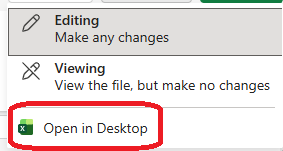
- Click on the Editing button in the upper right corner

- Click on Open in Desktop option
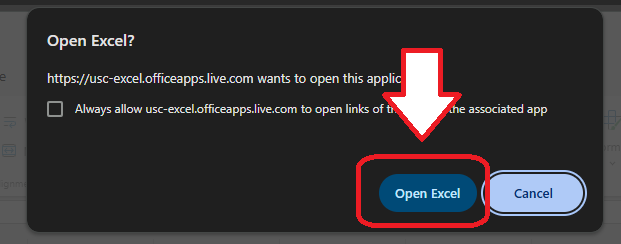
- Click Open Excel button
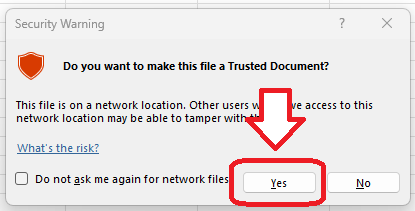
- Click on Enable Content button
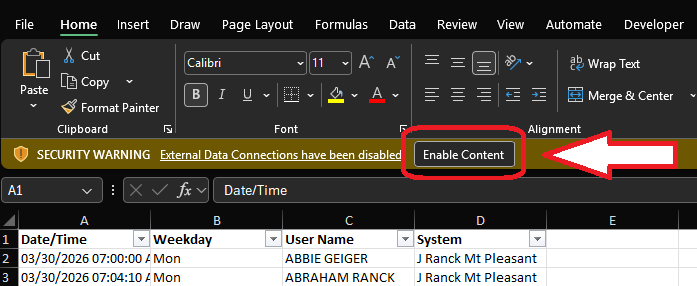
- If prompted with a Security Warning, click on Yes option for Trusted Document
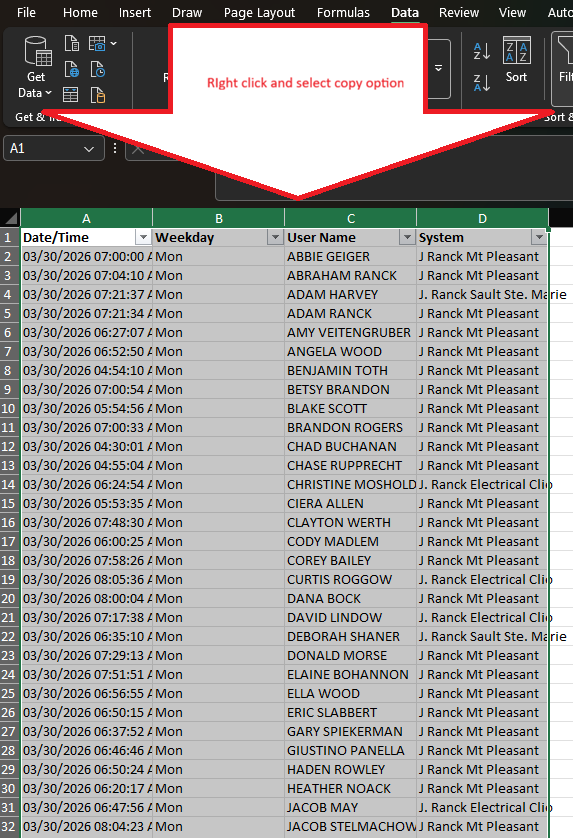
- Go back to the first spreadsheet that was cleansed and highlight columns A - D
- Right click and select Copy option
- Move back to the template and make sure the OnSite tab is displaying
- Click on A1 cell to select it
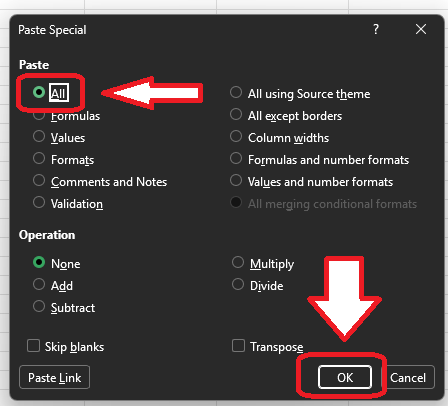
- Right click and select Paste Special option
- Leave All the selection option
- Click Ok button
- Click on the Active Employee List tab in the template
- Click on the Refresh All option in the tool bar. This brings in the most current active employee list from Spectrum
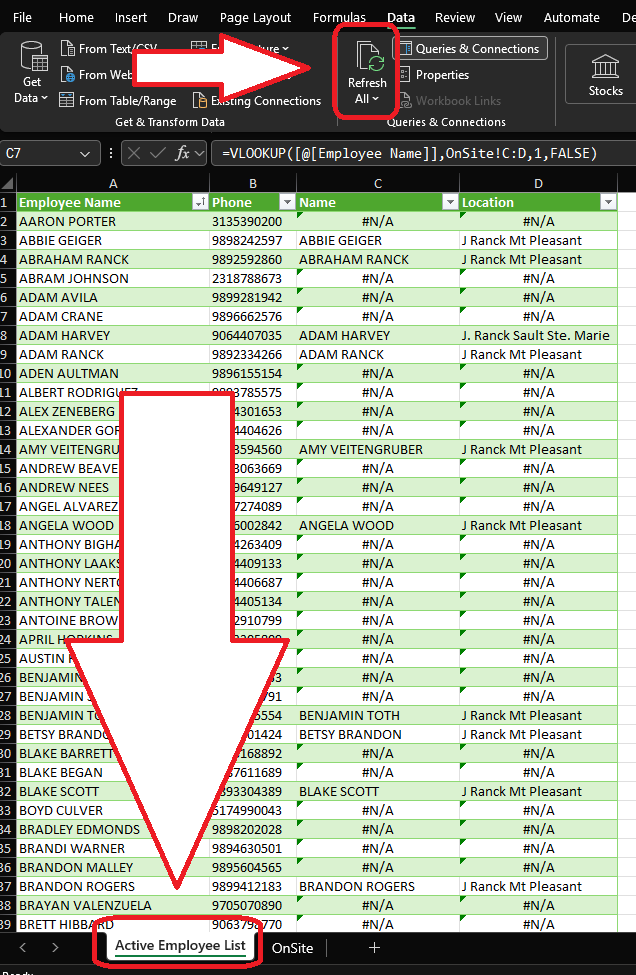
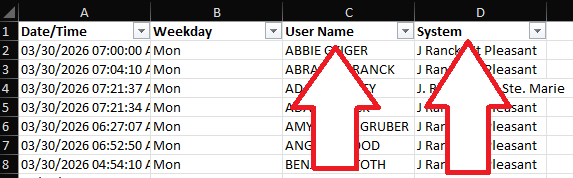
- The report will show all employees names and location of who checked in using the keypads. Those that did not use the keypad will show N/A
- This information can then be filter for employee names or by N/A to see who did not check in. It can also be filtered by location to see who checked in at each site NOTE: the employee name needs to be entered in the virtual keypad software the same way it is entered into Spectrum. If it is not the same the lookup will not work correctly in the spreadsheet.
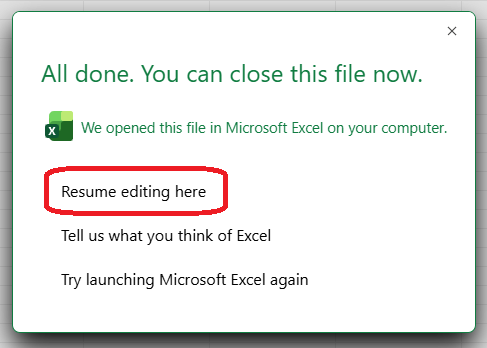
- Once the template has been updated it can be closed and a prompt will ask to close the file on Share Drive. Make sure to click Resume editing here option to allow the most current employee report to be save in Share Drive until the next update the next day.
Troubleshooting:
- Submit a ticket to IT support@jranck.com
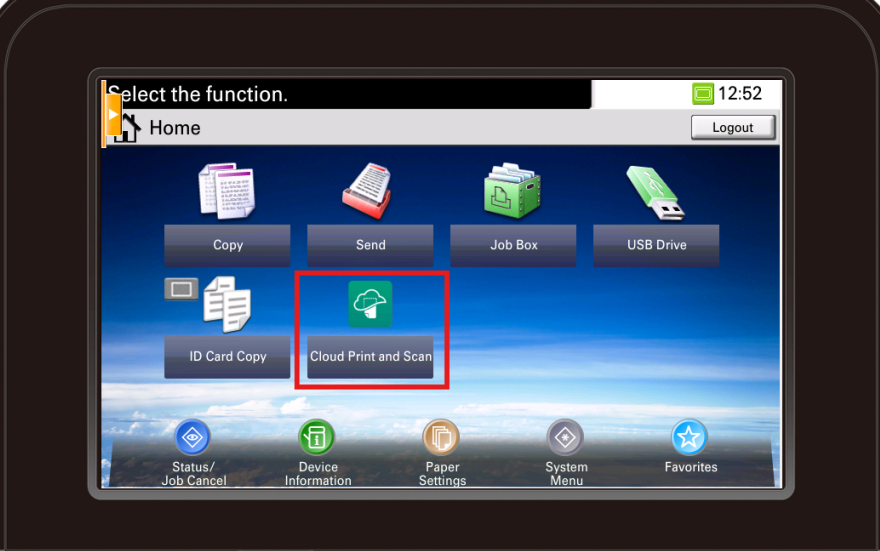
Using Shared Printers
First Time Setup
Computer Setup
YOU ONLY HAVE TO DO THIS ONCE
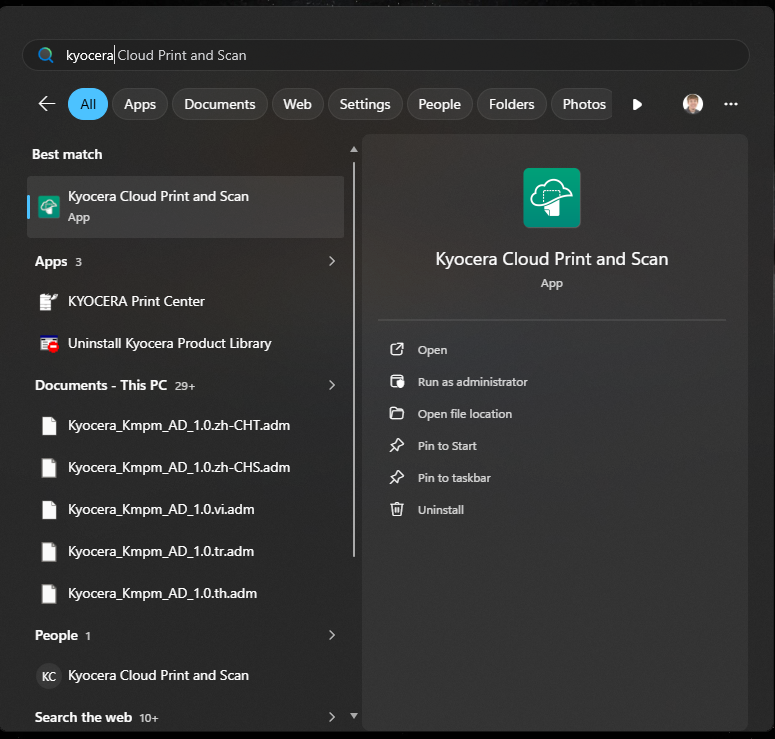
- Open the
Kyocera Cloud Print and ScanApplication
- You can find it on your desktop or by searching for
Kyocera Cloud Print and Scan
- A window will open asking you to login if you are not already signed in
- Click
Sign in with Microsoft
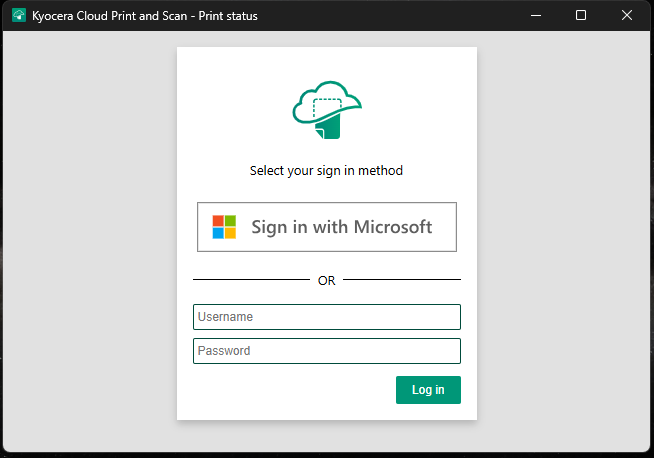
- Your browser will open to the usual Microsoft/JRE sign-in page
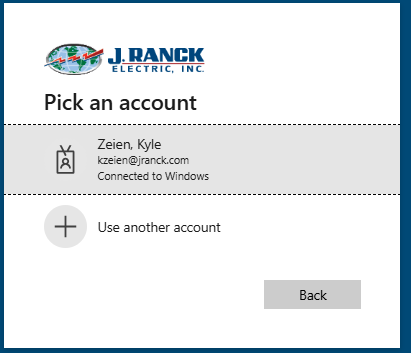
- Sign in to your account and then return to the app
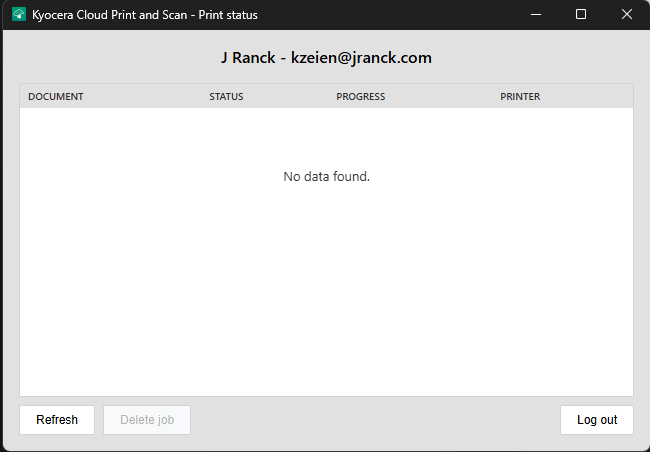
- You should now see a window similar to this
Printer Setup
YOU ONLY HAVE TO DO THIS ONCE. YOU CAN PERFORM THESE STEPS AT ANY PRINTER WITH A BADGE READER. THIS WILL CONFIGURE YOUR BADGE FOR ALL PRINTERS.
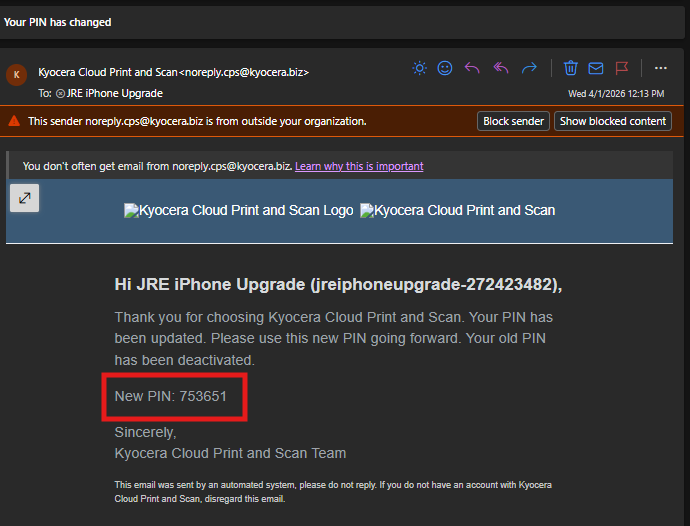
- Locate the email from
noreply.cps@kyocera.bizcontaining your PIN and write it down for a later step
- Scan your badge on the badge reader
- The printer will display
The ID card is not registered. Register your ID card?
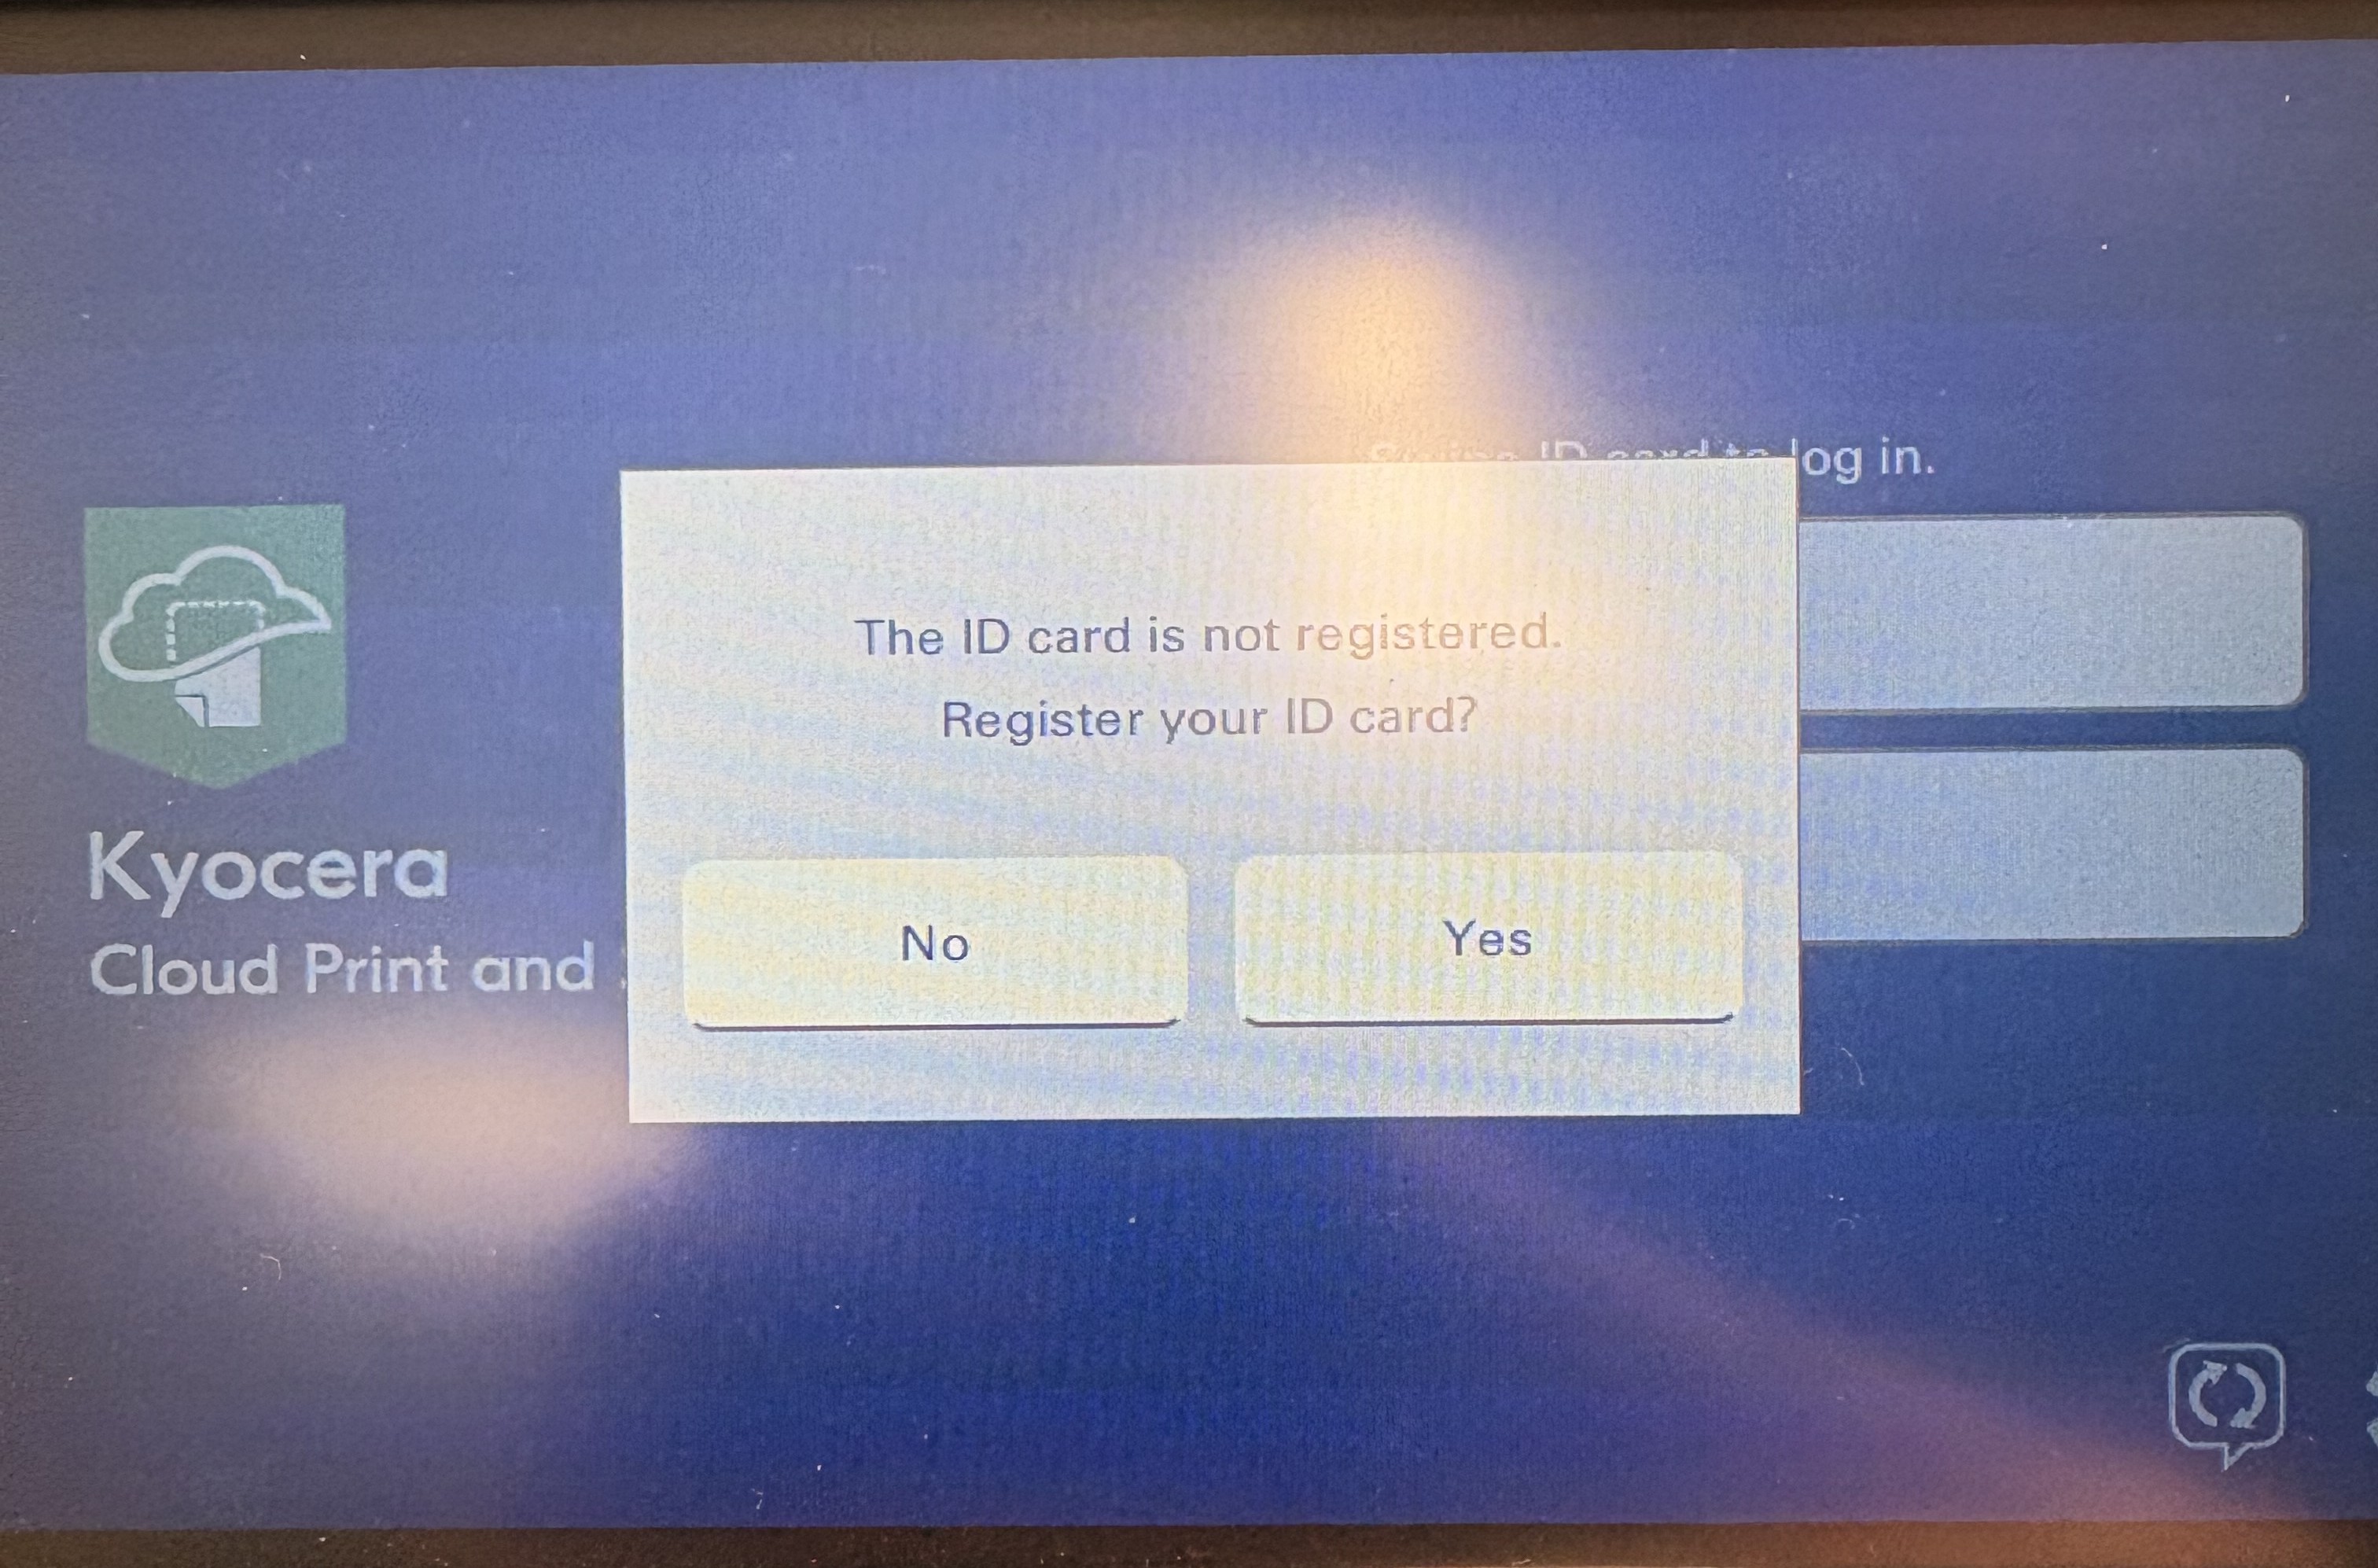
- Tap
Yes - Enter your PIN from the email and then tap Enter
- You will get a notification that the card has been registered. This allows you to use your badge on any printers that have a badge reader
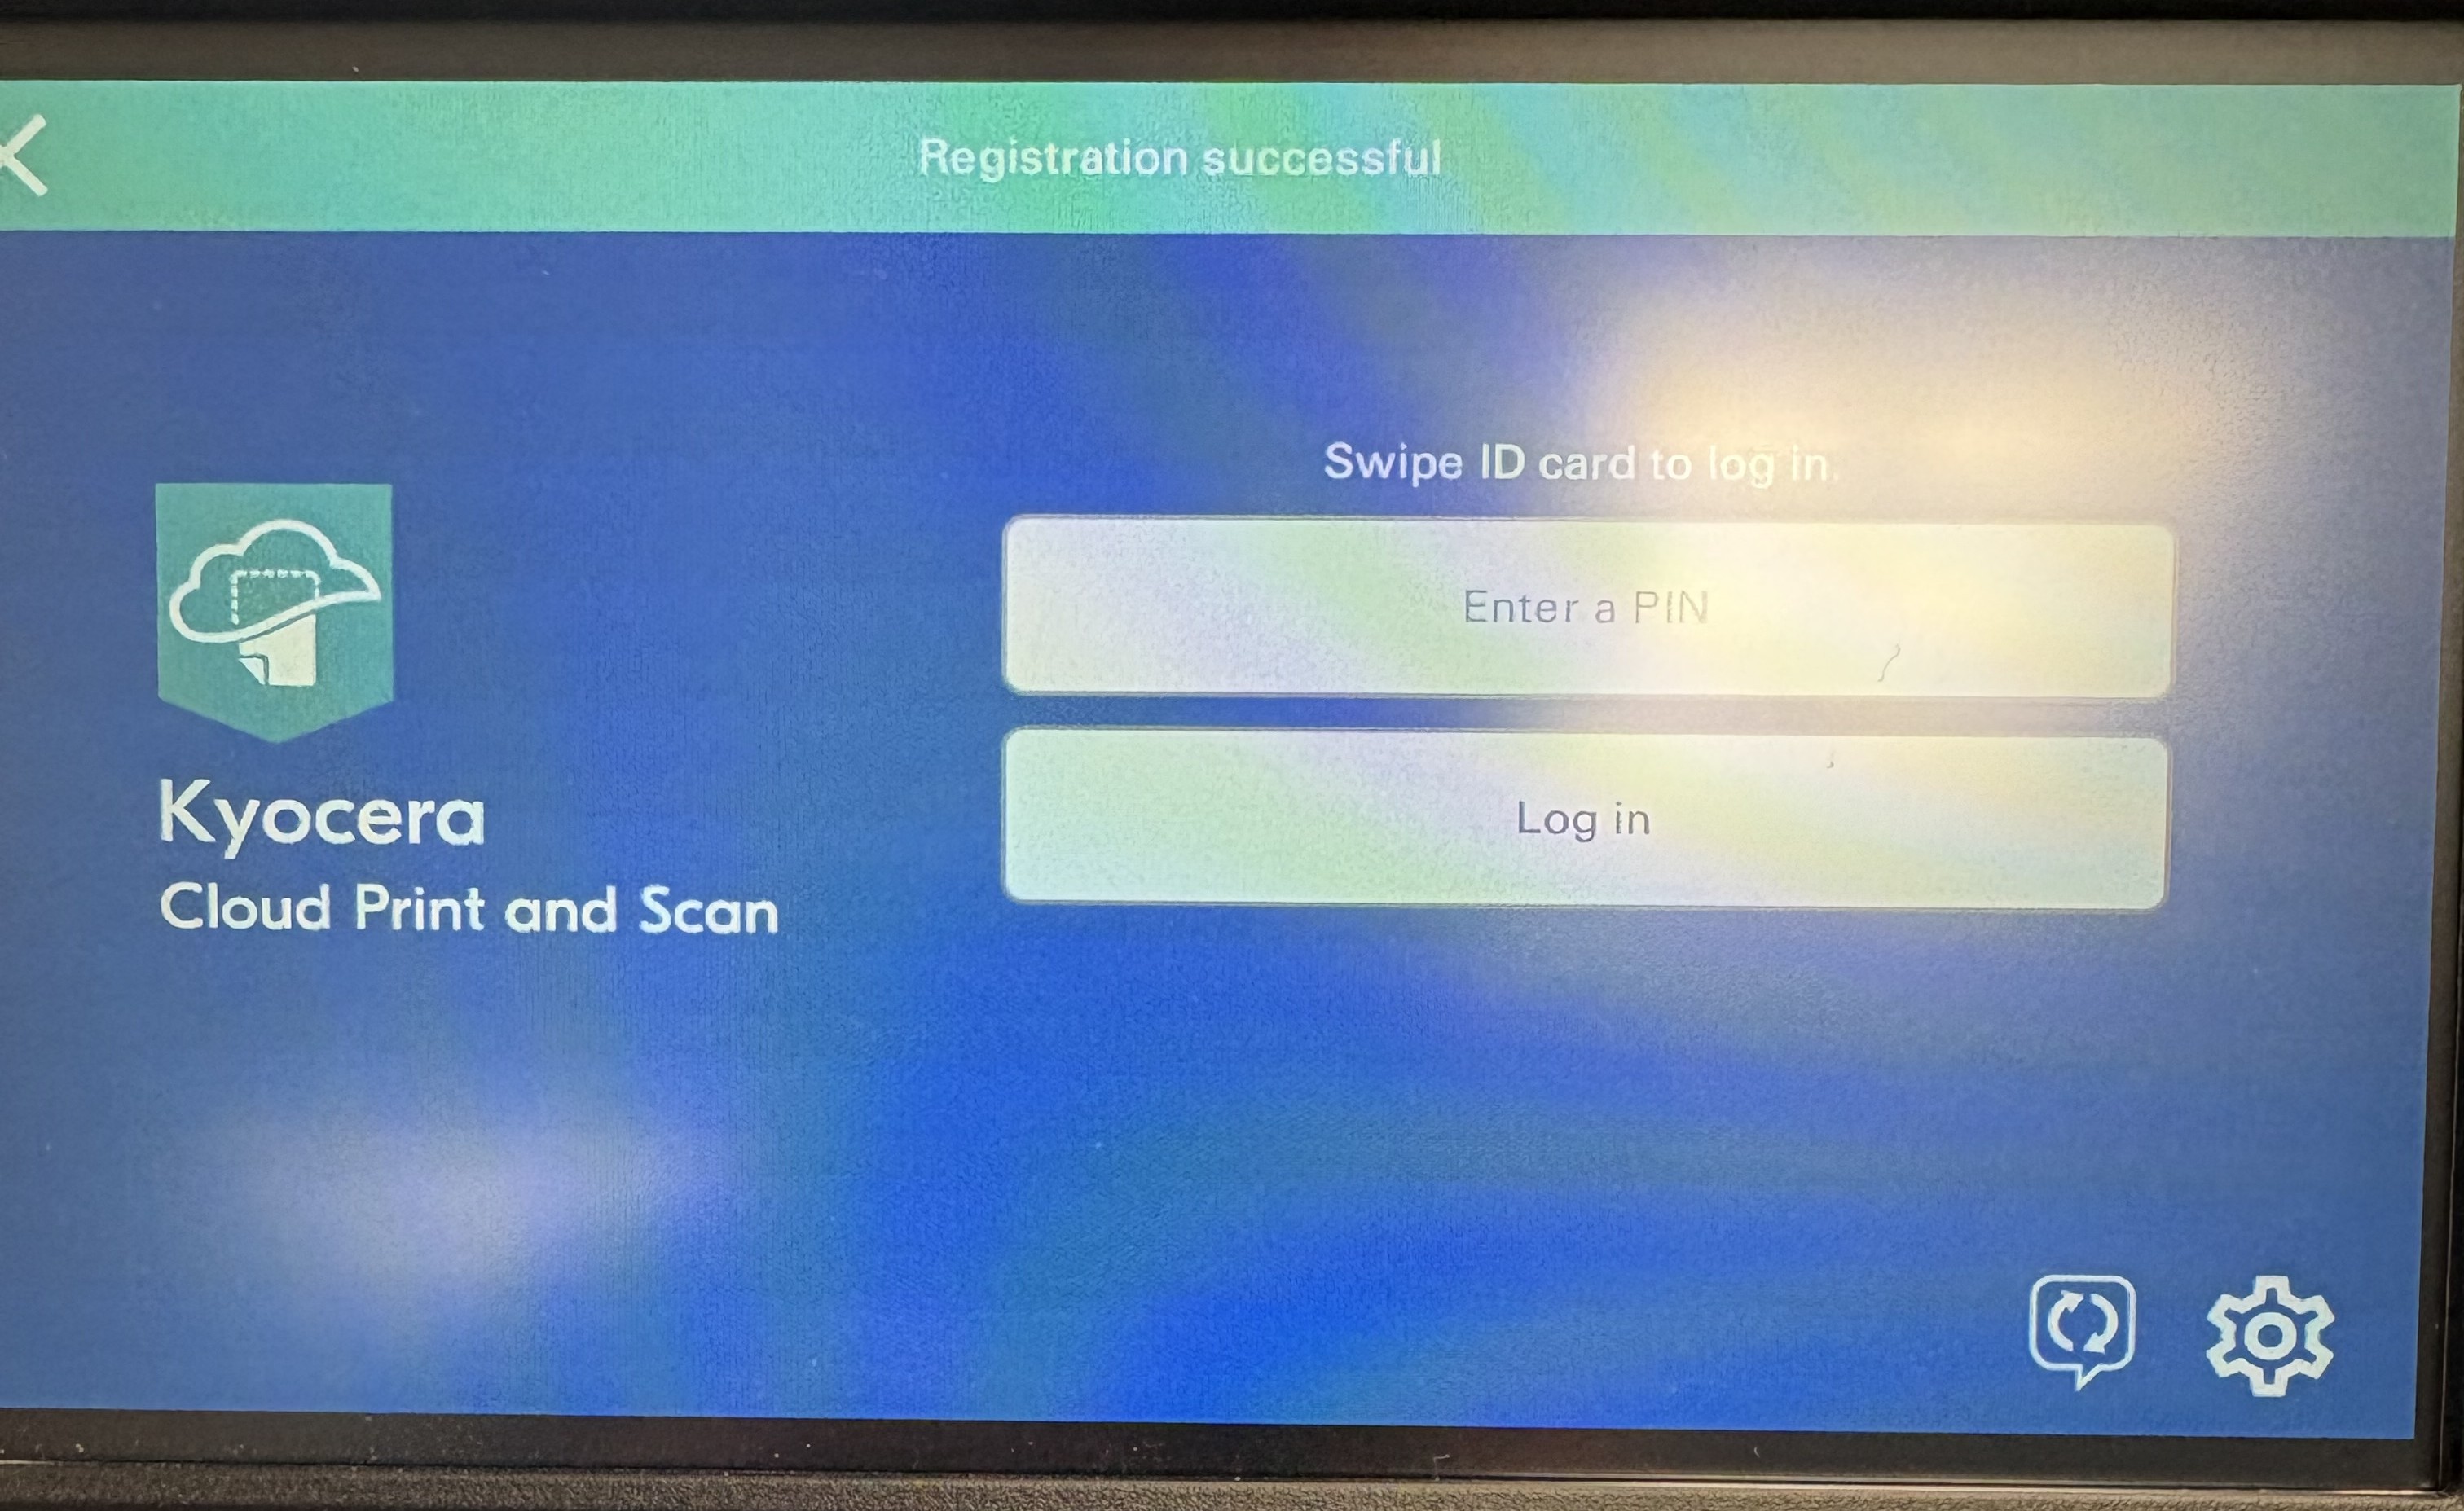
- You can now scan your badge to access the Kyocera Cloud Print and Scan application on any printer that has a badge reader
Printing
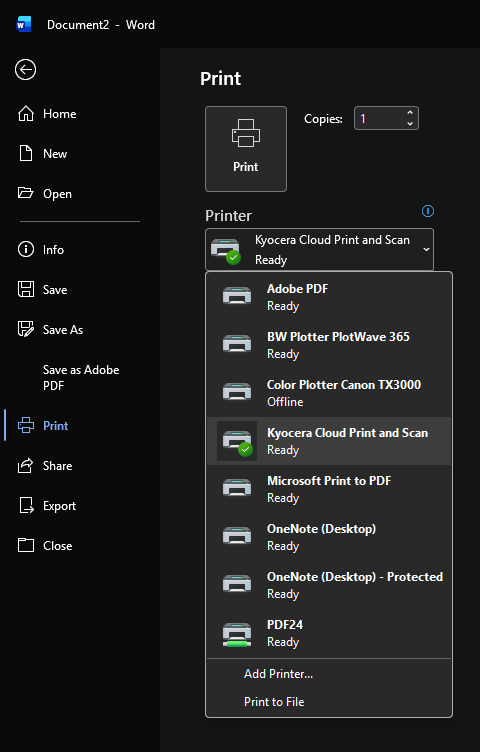
- Select the printer named
Kyocera Cloud Print and Scanand then click Print
- You can now go to any one of the shared printers
- Scan your badge
- Tap on
Kyocera Cloud Print and Scan
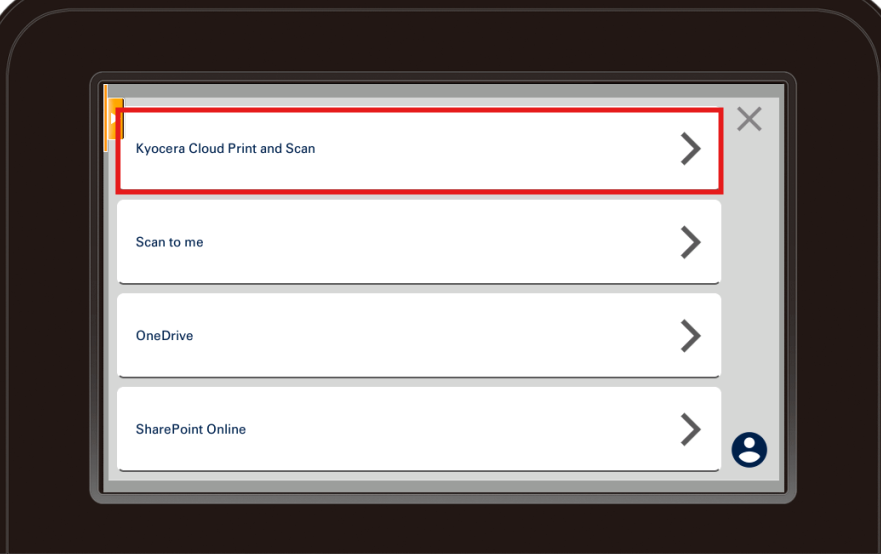
- Tap on your document(s) and then tap the printer icon
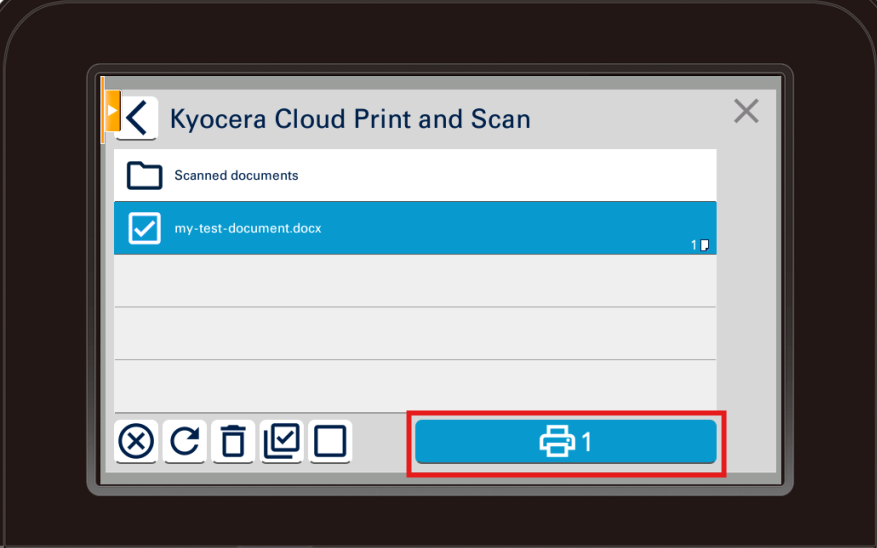
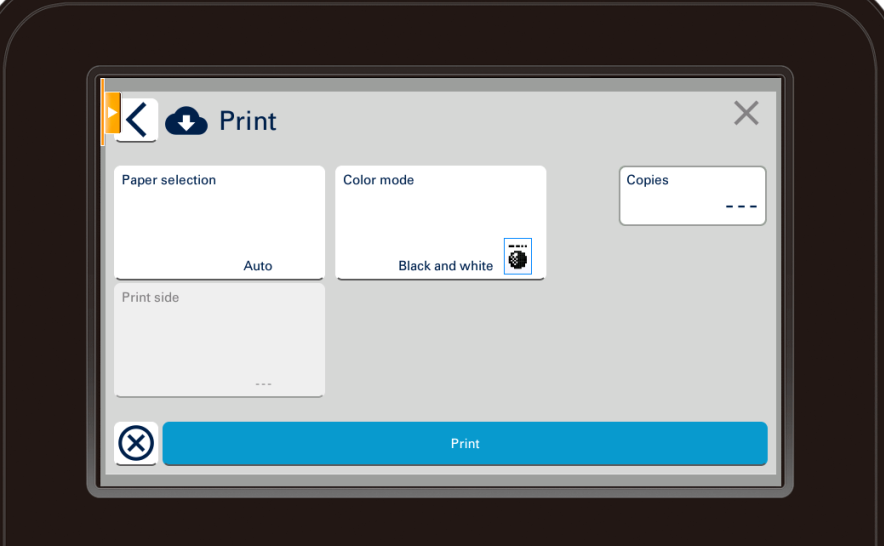
- Change any print settings you desire
- Tap Print
Scanning to Email
- Scan your badge
- Tap on
Kyocera Cloud Print and Scan
- Tap
Scan to me
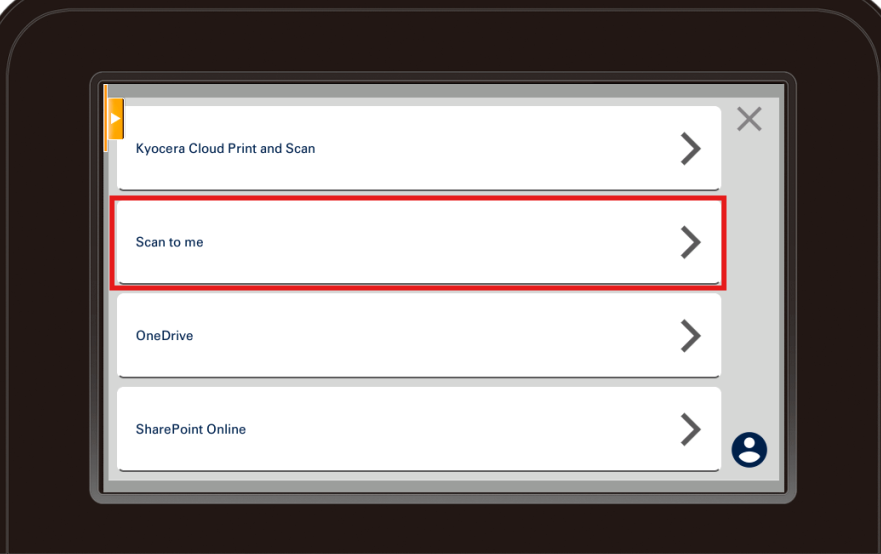
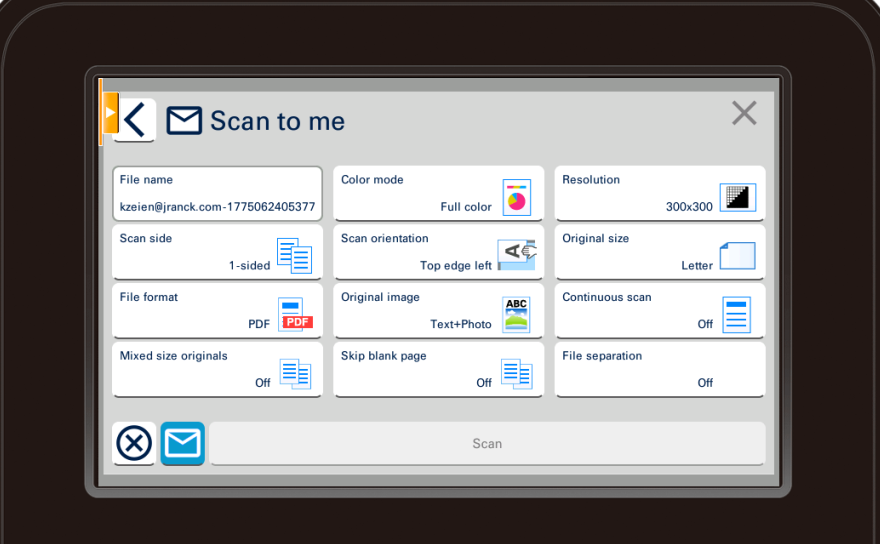
- Select your desired scan settings
- Tap
Scan
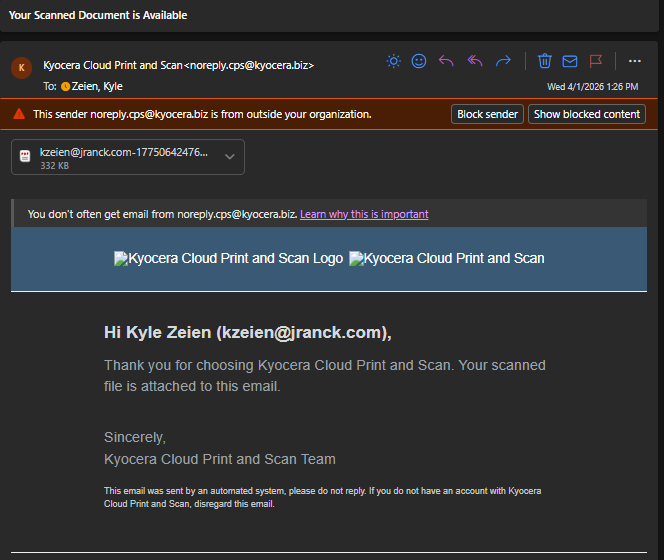
- You will receive an email from
noreply.cps@kyocera.bizwith the document attached
- If the file is larger than 10MB, the email will not include the attachment and will instead contain a link to the document
How to Find/Reset Your PIN
- Go to the Kyocera Web Portal or right click on the Kyocera app in your system tray and click
Go to home page
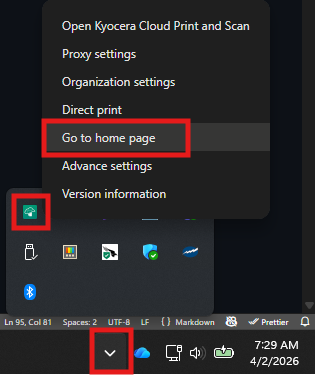
- Log in with your Microsoft/JRE account
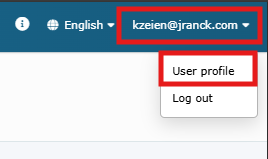
- In the top right corner of the page, click on your email address
- Click
User profile
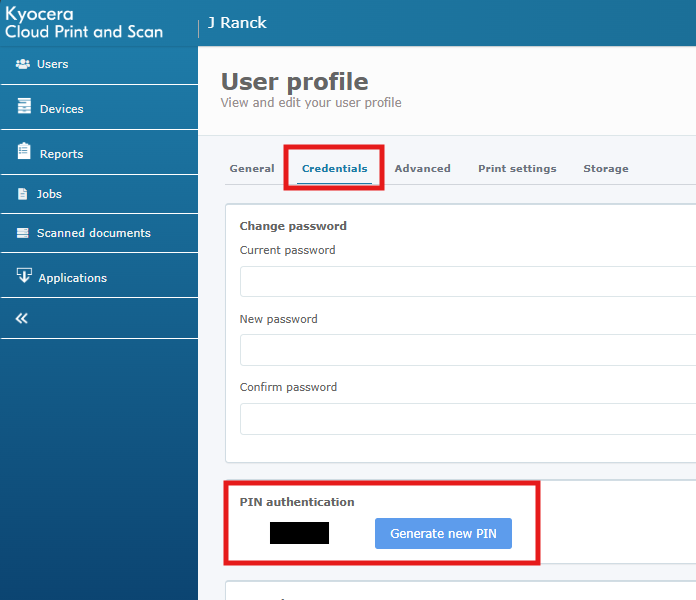
- Click the
Credentialmenu item - Your PIN is displayed below and also gives you the option to generate a new PIN
How to Enroll to Receive Your Payroll Statement by Email
Purpose:
Provide J. Ranck Electric, Inc, employees the basic steps to sign up to have their pay statement sent to their personal email address.
Prerequisite:
- Current JRE employee
Who's Responsible:
- All employees
Process:
- Go to the J. Ranck Employee Dashboard
- Access the page by using this QR code:
-

- Or type the URL link in your browser: https://apps.jranck.com.
-
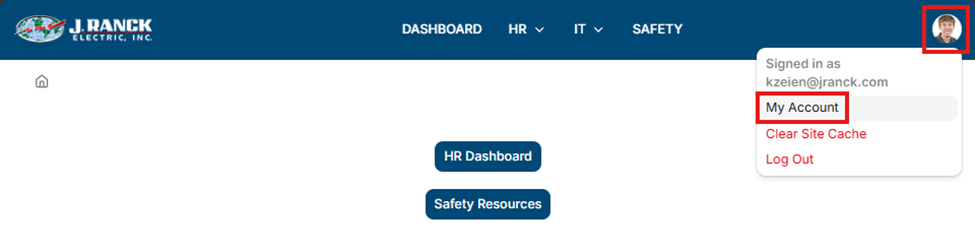
- On the main page after you log in, select your image on the top right of the screen.
- Select My Account for the drop-down list:

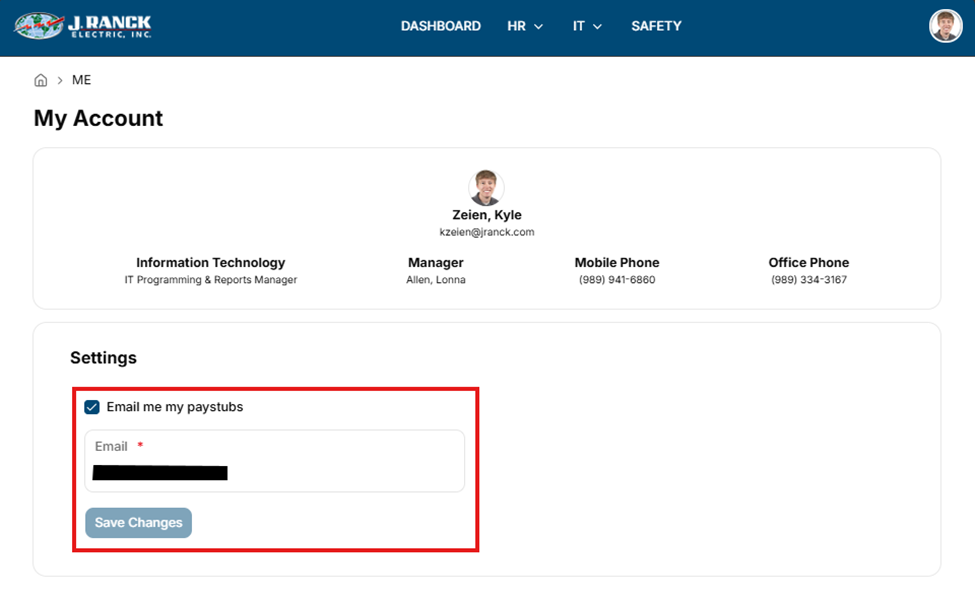
- You will be directed to a page where you can enter your signup information.
- This will take you to a form and information page. In the Settings section, check the box labeled “Email me my paystubs”. You can then enter a valid email address in the Email box. Then click on the Save Changes button.
- IMPORTANT! By entering a personal email address, you are assured that any final pay statements are received as any jranck.com email addresses are invalid once an employee leaves J. Ranck Electric, Inc.
- You may also contact the IT Department. Their staff can also sign you up.
Troubleshooting:
- For technical issues submit a ticket to IT support@jranck.com